Web-Based User Interface
The IMS Suite web-based user interface (web UI) application (VSUI) consolidates and facilitates the configuration of all installed IMS Suite applications.
Web Browser Requirements
The VSUI can be accessed from any of the following web browsers:
Account Roles
The type of user account determines the selections available in the main menu, and the permissions assigned to a user further define the tasks that they can perform.
The different roles are defined as:
Platform Owners deploy the network that runs IMS Suite applications. The Platform Owner is responsible for defining global configuration objects and creating IMS domains and the Service Providers.
Service Providers can edit IMS domains and then provision each element using the available objects.
Each Platform Owner can have the following permissions:
Name |
Permission |
|---|---|
User Administration |
Add, remove, and edit other Platform Owners. |
Service Providers |
Add, remove, and edit Service Providers. |
Settings |
Edit system-wide application settings. |
Each Service Provider can have the following permissions:
Name |
Permission |
|---|---|
User Administration |
Add, remove, and edit other Service Providers. |
Service Provisioning |
Add, remove, and edit provisioning data. |
Settings |
Edit system-wide application settings. |
Note
Permissions that any user has access to may be set on a per-user basis.
Using the Web UI as a Platform Owner
Opening the Web UI
In a web browser, connect to the host address of the NIU.
On the Login page, enter the Username and Password.
Tip
Click Forgot Password to generate a password reset link.
Default user name: vsui_administrator Default password: im5_wrkX
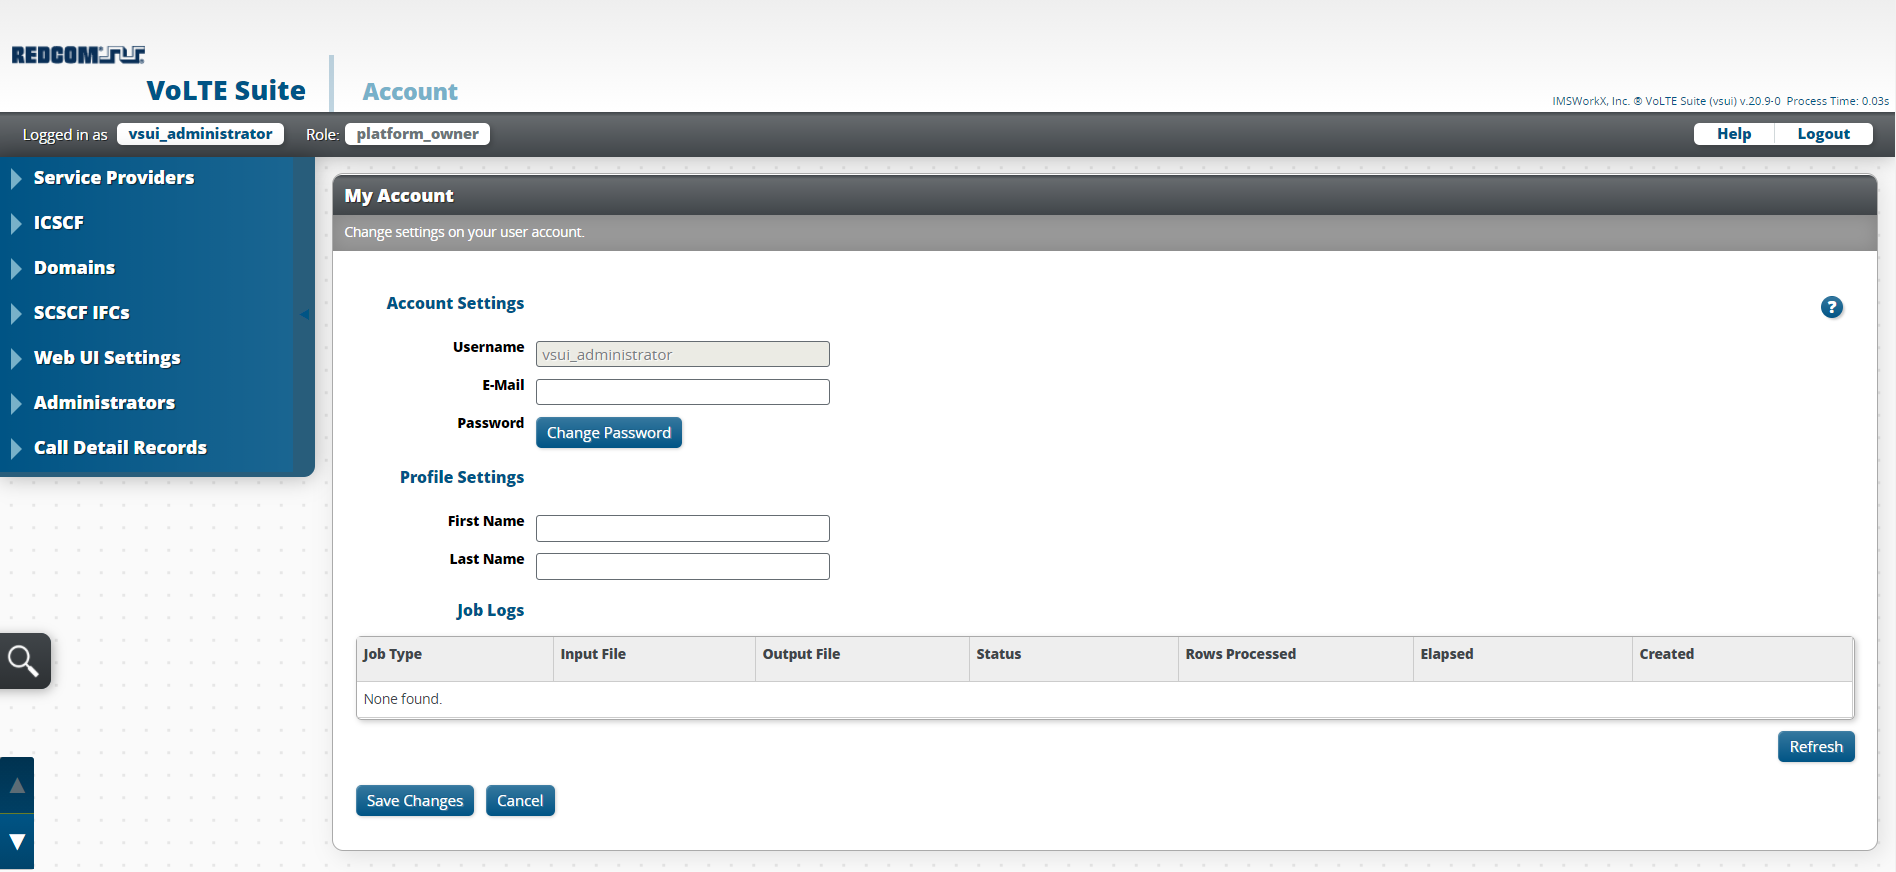
Click Login. The My Account page will be displayed.
Tip
This page can be accessed at any time by clicking the user name next to “Logged in as”.
Changing the Password
Click Change Password on the My Account page.
Enter the Current Password and the New Password.
Click Save Changes.
Note
The new password must be a minimum of 8 characters and a maximum of 16 characters.
Managing Service Providers
Click Service Providers in the main menu to view a list of all existing service provider accounts.
To Add Service Providers
Click Add on the task bar.
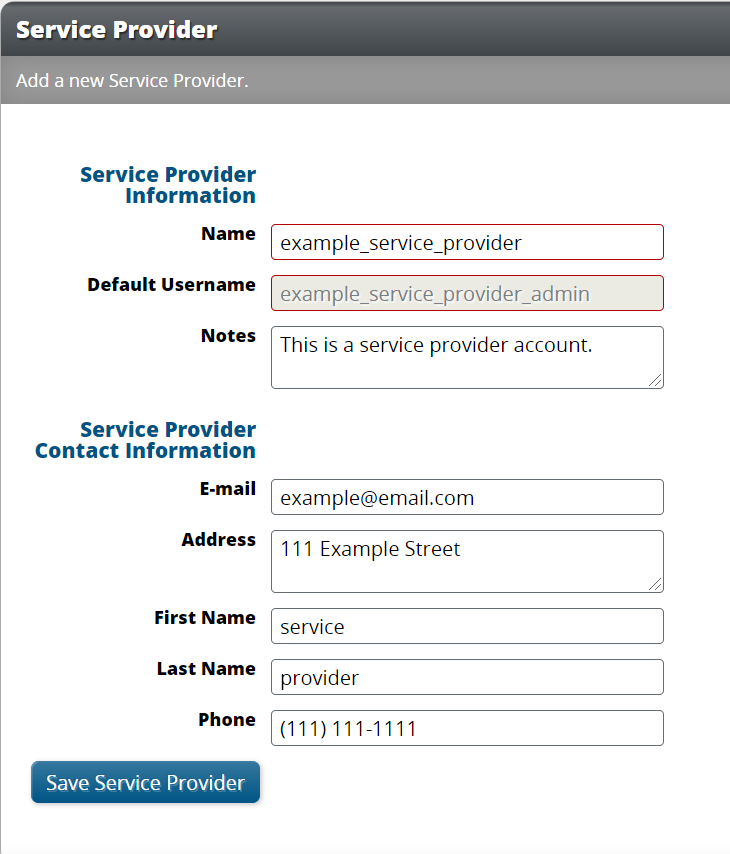
Enter the user information in the text boxes.
Setting |
Description |
|---|---|
Name |
Name of the Service Provider. |
Default Username |
User name to log in to the default account. |
Notes |
Blank area to record notes. |
Notifications and password reset requests are sent to this email address. |
|
Address |
Physical address of the Service Provider. |
First Name |
First name of entity who uses the account. |
Last Name |
Last name of entity who uses the account. |
Phone |
Primary phone number of the contact. |
Click Save Service Provider.
To Edit Service Providers
Right-click on the Service Provider to be edited.
Click Edit Service Provider.
Make necessary changes.
Click Save Service Provider.
Managing Domains
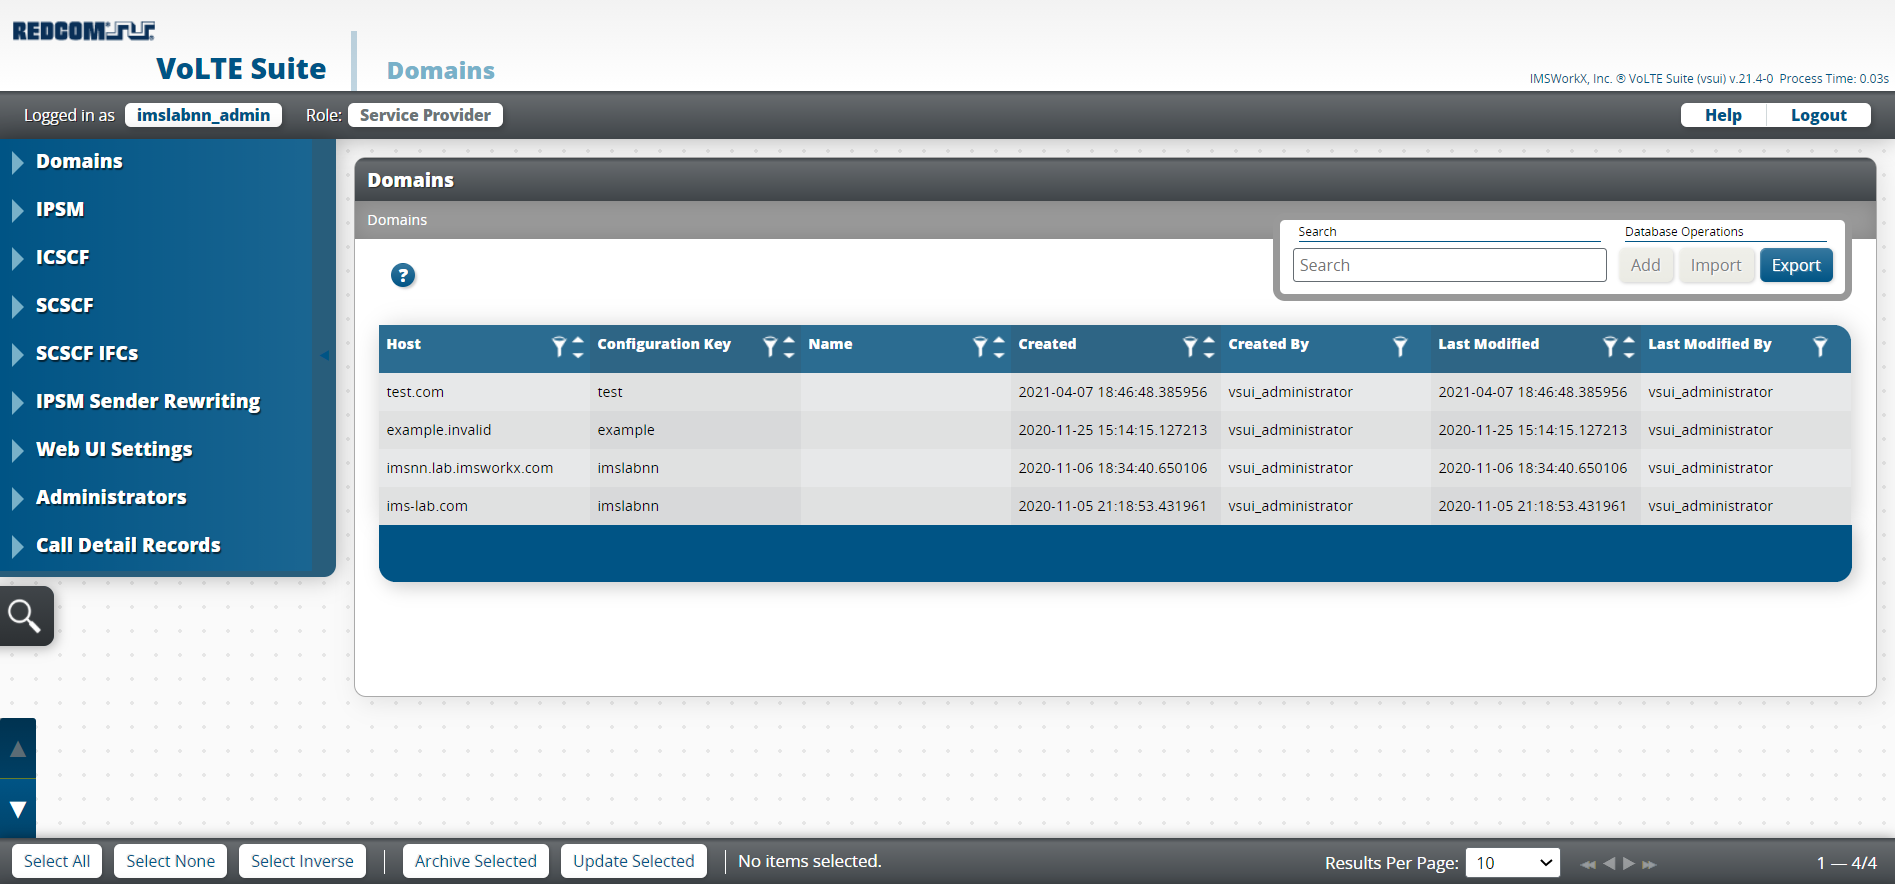
Click Domains in the main menu to view a list of all existing IMS domains.
To Add Domains
Click Add on the task bar.
Enter the user information in the text boxes.
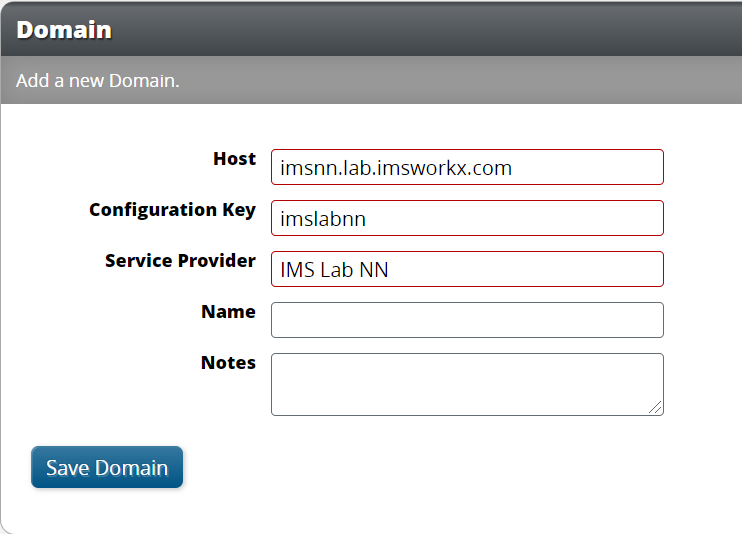
Setting |
Description |
|---|---|
Host |
The host for this domain. This must be a host name, IPv4 address, or IPv6 address. |
Configuration Key |
Name of the configuration key for this domain. |
Service Provider |
Name of the Service Provider using this domain. |
Name |
Name of the domain. |
Notes |
Blank area to record notes. |
Click Save Domain.
To Edit Domains
Right-click on the domain to be edited.
Click Edit Domain.
Make the required changes in the text boxes.
Click Save Domain.
Managing Elements
The IMS Suite represents a modular product offering with additions up to an entire IMS core to provide network elements for proper functionality. The following elements are available:
I-CSCF
S-CSCF
IP-SM-GW
All these network elements can be easily configured through the web UI. Configuration is accomplished by assigning values to settings for each element. For a full list of configuration value details and descriptions, see Provisioning Data.
Click an element in the main menu to view and edit settings.
Note
The elements that are available in the menu will vary based on which IMS applications are currently installed.
After clicking an element, click an object in the Settings Store list on the right of the screen. The following images are examples of what the web UI may look like after selecting it an object from the list.
This example shows editing the value for the global I-CSCF element object called java-timeout.

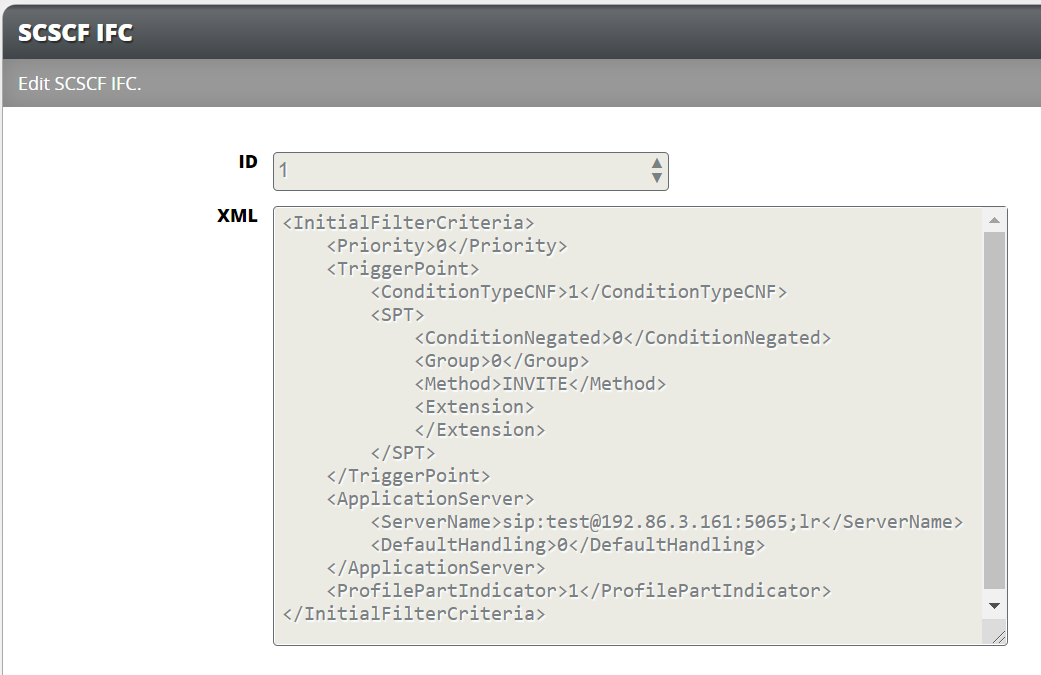
Managing S-CSCF IFCs
If S-CSCF is currently installed, click S-CSCF IFC in the main menu to view existing initial filter criteria.
Note
S-CSCF IFCs can be modified only by the Platform Owner. A Service Provider can only view these IFCs and apply them to their S-CSCF domains in a configuration key.
To Add IFCs
Click Add on the task bar.
Enter the IFC information in the text boxes.
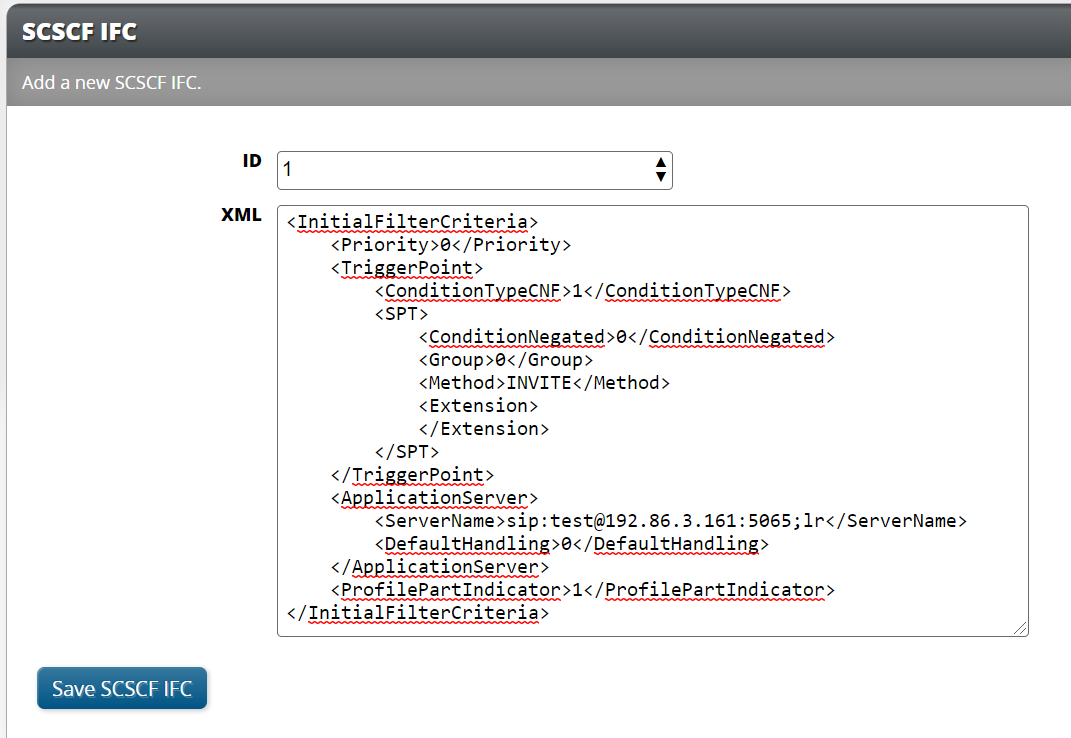
Setting |
Description |
|---|---|
ID |
A numeric ID for this set of IFC rules. |
XML |
The XML formatted text that defines the IFC. IFC rules strictly follow specifications in Annex E “XML schema for the Cx interface user profile” of TS 129.228. |
Click Save SCSCF IFC.
To Edit IFCs
Right-click on the IFC to be edited.
Click Edit IFC.
Make the required changes in the text boxes.
Click Save SCSCF IFC.
Managing Settings
Click Settings in the main menu to view and edit application-wide settings.
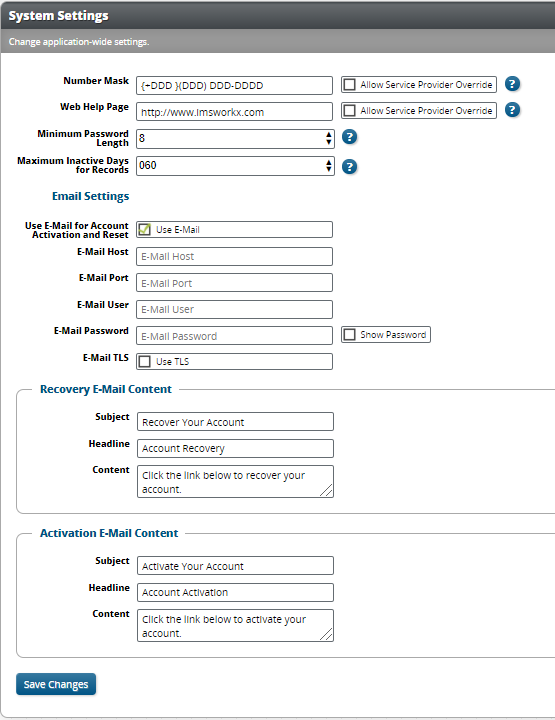
Setting |
Description |
|---|---|
Number Mask |
Specifies the default format of added phone numbers. For example, d(ddd)ddd-dddd would format 15551234987 into 1(555)123-4987. |
Web Help Page |
Determines the page to which Service Providers are redirected after selecting Help. |
Minimum Password Length |
The minimum number of characters that a password must be. |
Maximum Inactive Days for Records |
VSUI will remove records that have been inactive longer than this value every night at midnight, which is determined by the time on the active NIU. A value of zero will never remove inactive records. |
Use E-Mail for Account Activation and Reset |
Determines whether an email message is sent during account activation or password recovery. |
E-Mail Host |
Specifies the host used to send the account activation and password recovery email messages. |
E-Mail Port |
Specifies the port used to send the account activation and password recovery email messages. |
E-Mail User |
Specifies the user used to send the account activation and password recovery email messages. |
E-Mail Password |
Specifies the password of the user used to send the account activation and password recovery email messages. |
E-Mail TLS |
Specifies whether TLS is used for the account activation and password recovery email messages. |
Recovery E-Mail Content |
Determines the Subject, Headline, and Content of a password recovery email message. |
Activation E-Mail Content |
Determines the Subject, Headline, and Content of an account activation email message. |
Managing Administrators
Click Administrators in the main menu to view a list of all existing platform owner accounts added.
To Add Administrators
Click Add on the task bar.
Enter the user information in the text boxes.
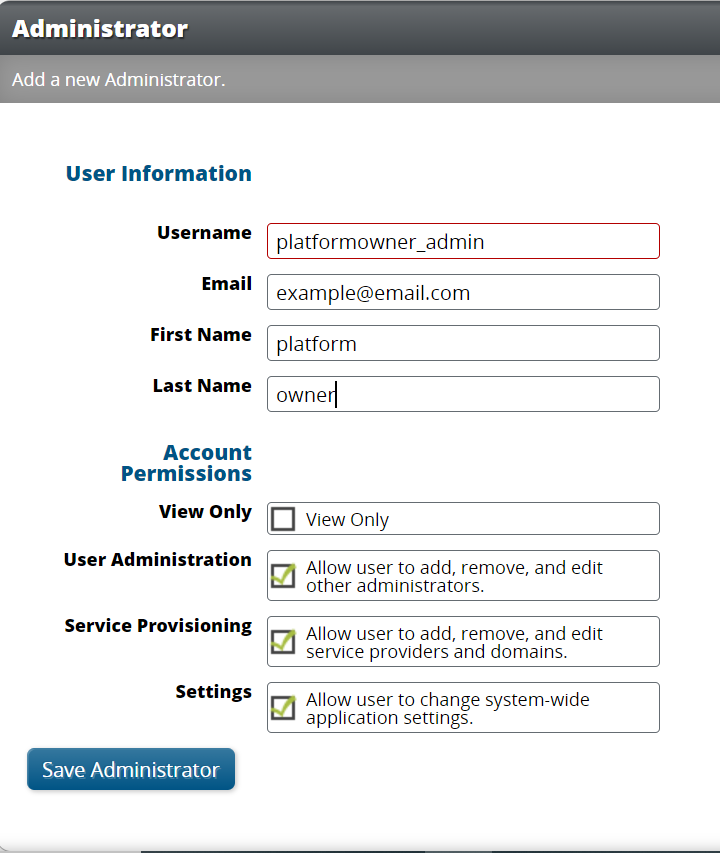
Setting |
Description |
|---|---|
Username |
User name to log in to the default account. Can contain only lowercase characters, numbers, or underscores. |
Notifications and password reset requests are sent to this email address. |
|
First Name |
First name of entity who uses the account. |
Last Name |
Last name of entity who uses the account. |
View Only |
Make this account view only or assign permissions. |
User Administration |
Add, edit, and remove other Platform Owners. |
Service Provisioning |
Add, edit, and remove configuration keys and values. |
Settings |
Edit system-wide application settings. |
Click Save Administrator.
To Edit Administrators
Right-click on the Administrator to be edited.
Click Edit Administrator
Make necessary changes.
Click Save Administrator.
Call Detail Records
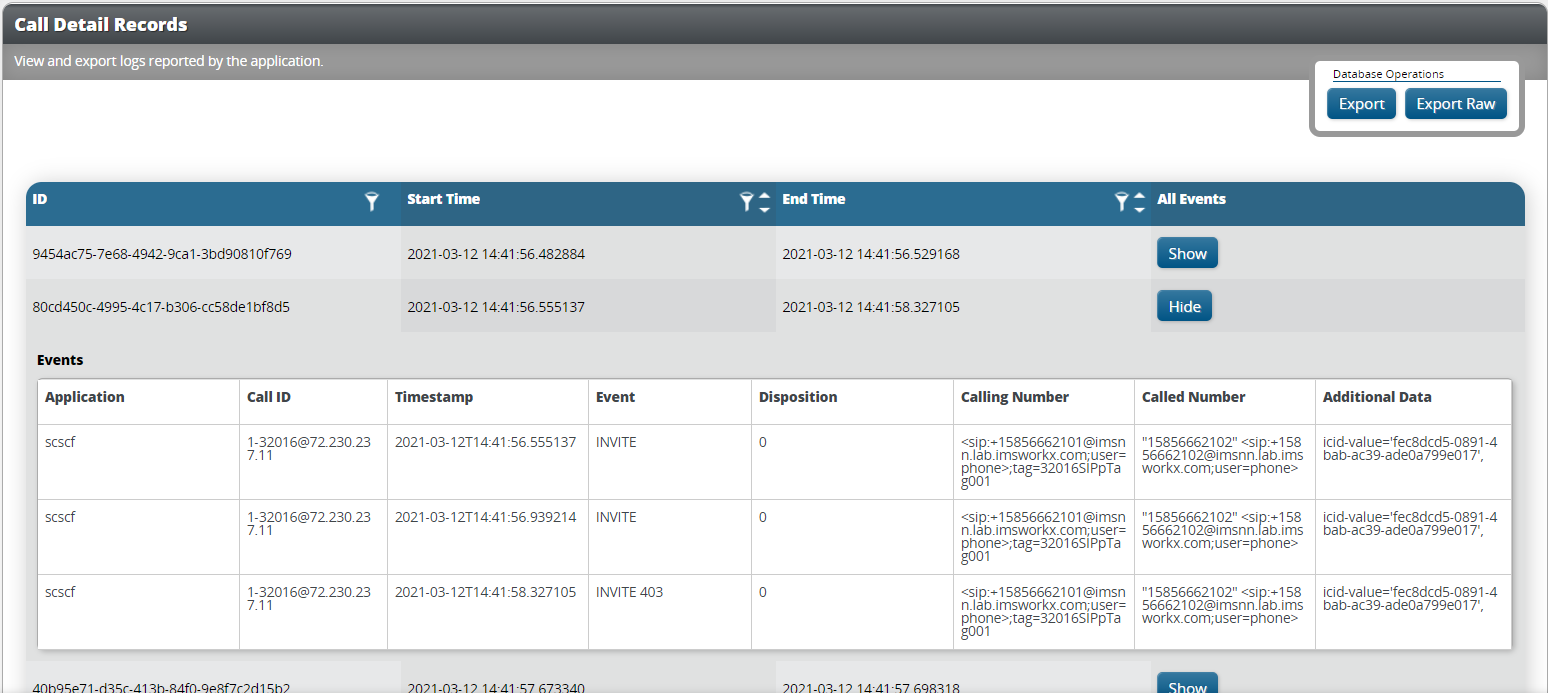
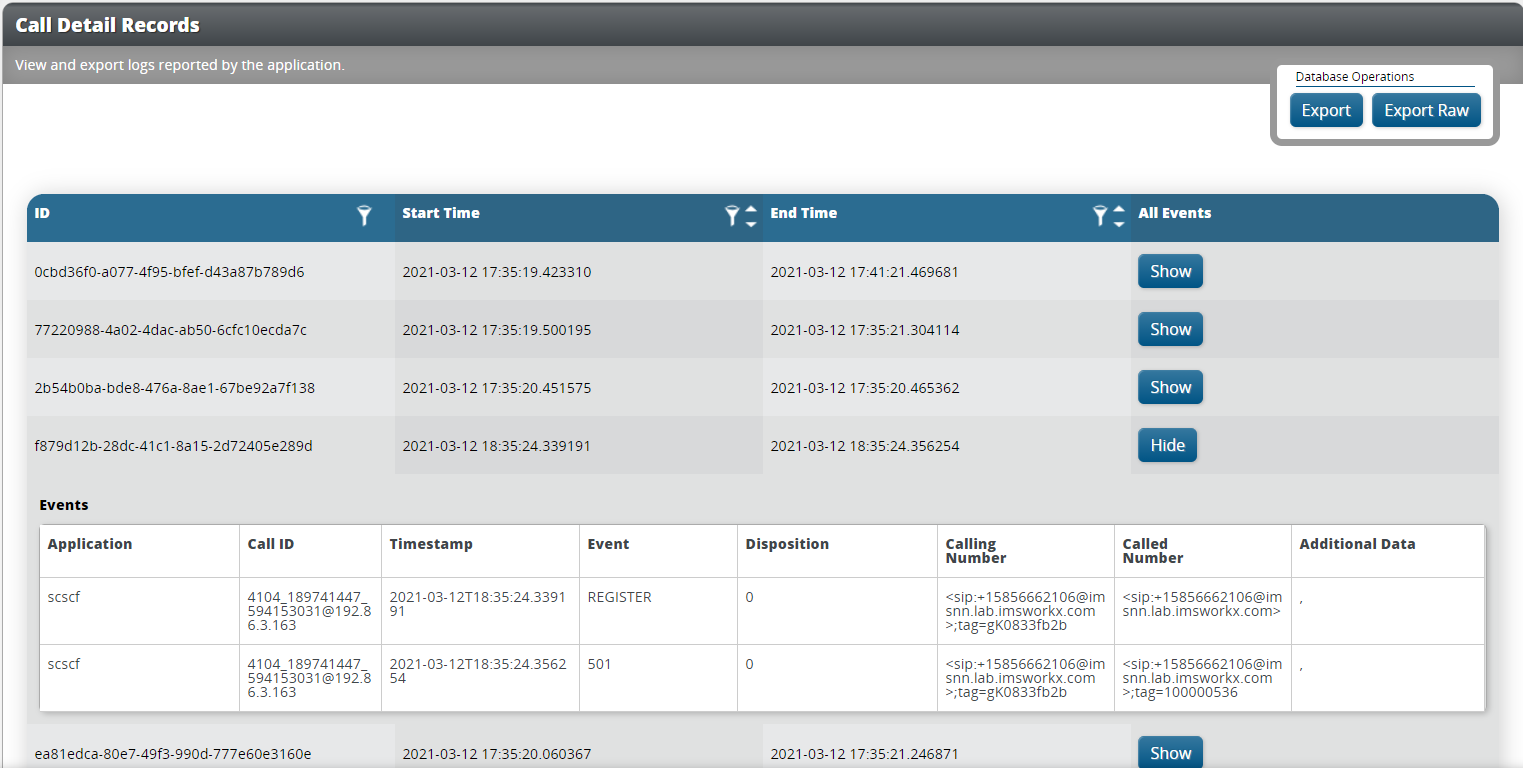
Click Call Detail Records in the main menu to view and export CDRs. The type of account and assigned permissions determine the records that are available to view.
Platform Owners can view statistics for all services that they host.
Using the Web UI as a Service Provider
Opening the Web UI
In a web browser, connect to the host address of the NIU.
On the Login page, enter the Username and Password.
Tip
Click Forgot Password to generate a password reset link.
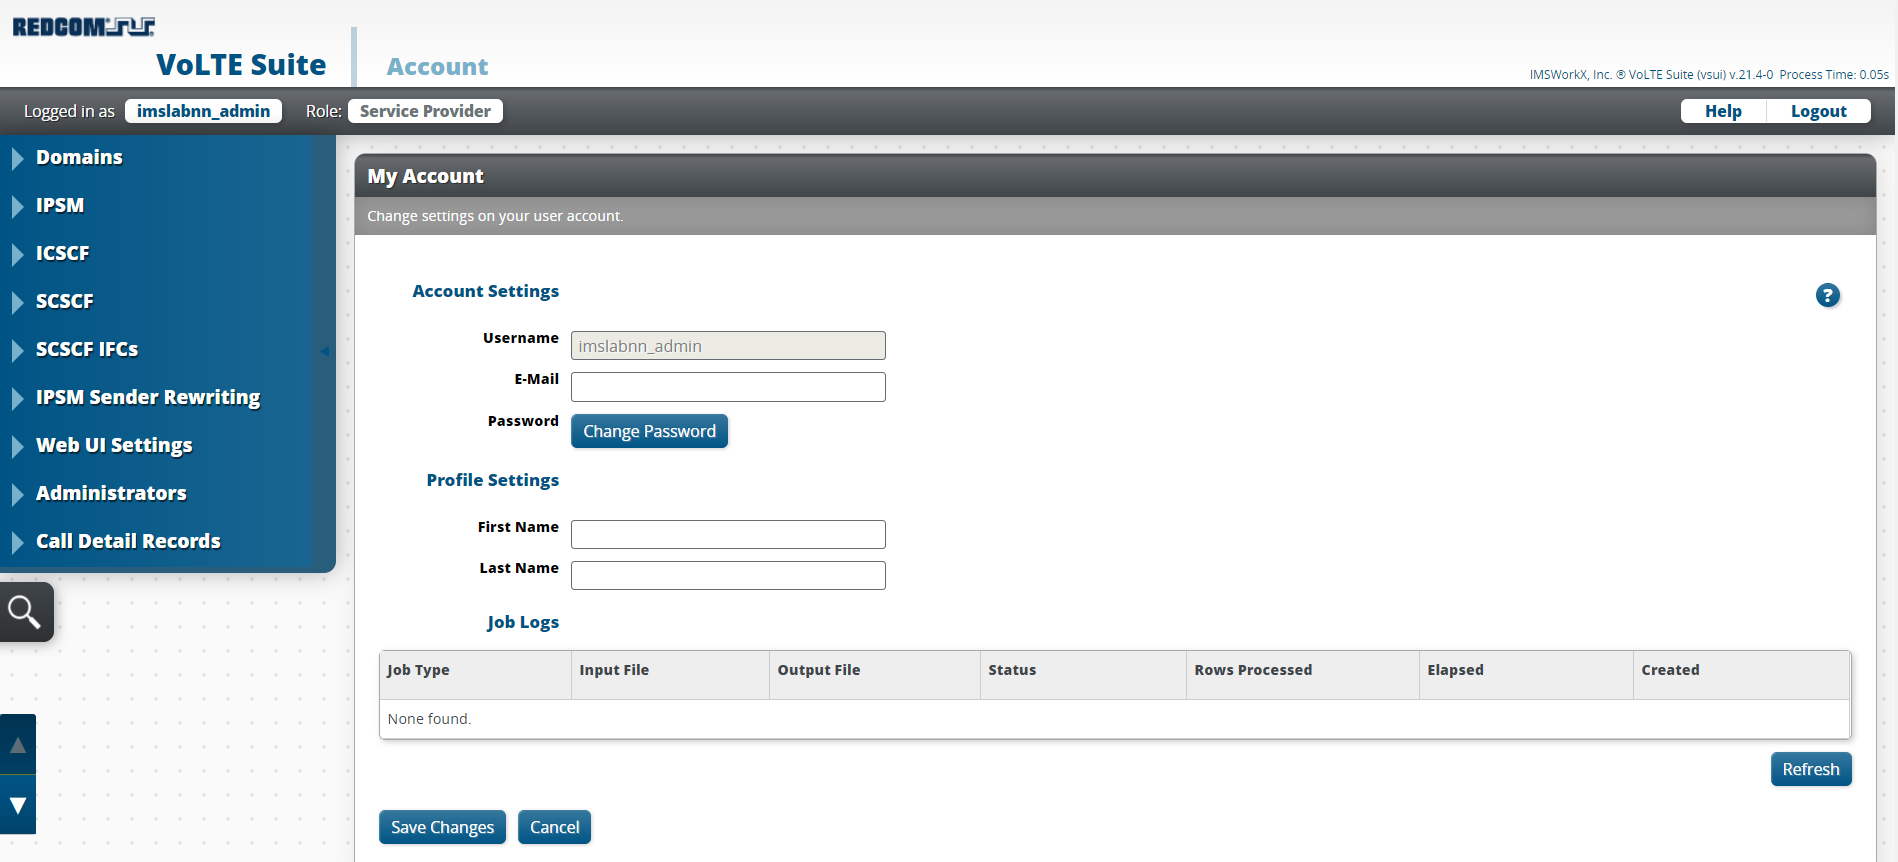
Click Login. The My Account page will be displayed.
Note
This page can be accessed at any time by clicking the user name next to “Logged in as”.
Changing The Password
Click Change Password on the My Account page.
Enter the Current Password and the New Password.
Click Save Changes.
Tip
The new password must be a minimum of 8 characters and a maximum of 16 characters.
Managing Domains
Click Domains in the main menu to view a list of existing IMS domains.
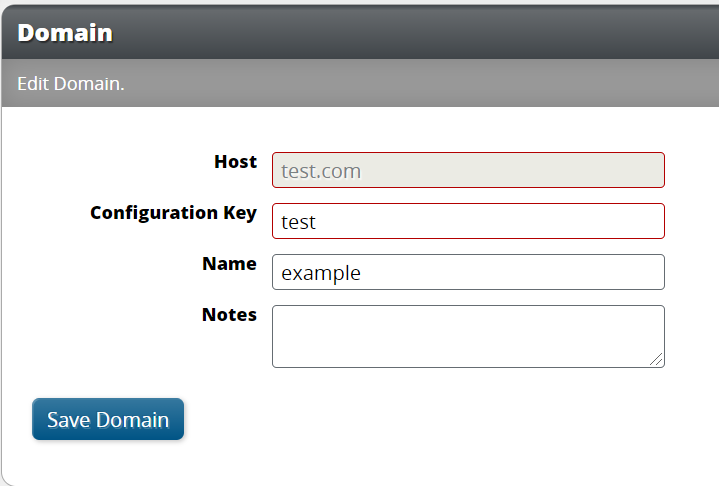
To Edit Domains
Right-click on the domain to be edited.
Click Edit Domain.
Make the required changes in the text boxes.
Setting |
Description |
|---|---|
Host |
The host for this domain. This value cannot be changed by a Service Provider. |
Configuration Key |
Name of the configuration key for this domain. |
Name |
Name of the domain. |
Notes |
Blank area to record notes. |
Click Save Domain.
Managing Elements
The IMS Suite represents a modular product offering with additions up to an entire IMS core to provide network elements for proper functionality. The following elements are available:
I-CSCF
S-CSCF
IP-SM-GW
All these network elements can be easily configured through the web UI. Configuration is accomplished by assigning values to settings for each element. For a full list of configuration value details and descriptions, see Provisioning Data.
The Platform Owner must first define the IMS domains to be served and one or more configuration keys for Service Providers. The configuration key represents an IMS domain or set of IMS domains that is assigned to a particular Service Provider. The configuration key then determines the data that is accessible for provisioning by the Service Provider.
Click an element in the main menu to view and edit settings.
Note
The elements that are available in the menu will vary based on which IMS applications are currently installed.
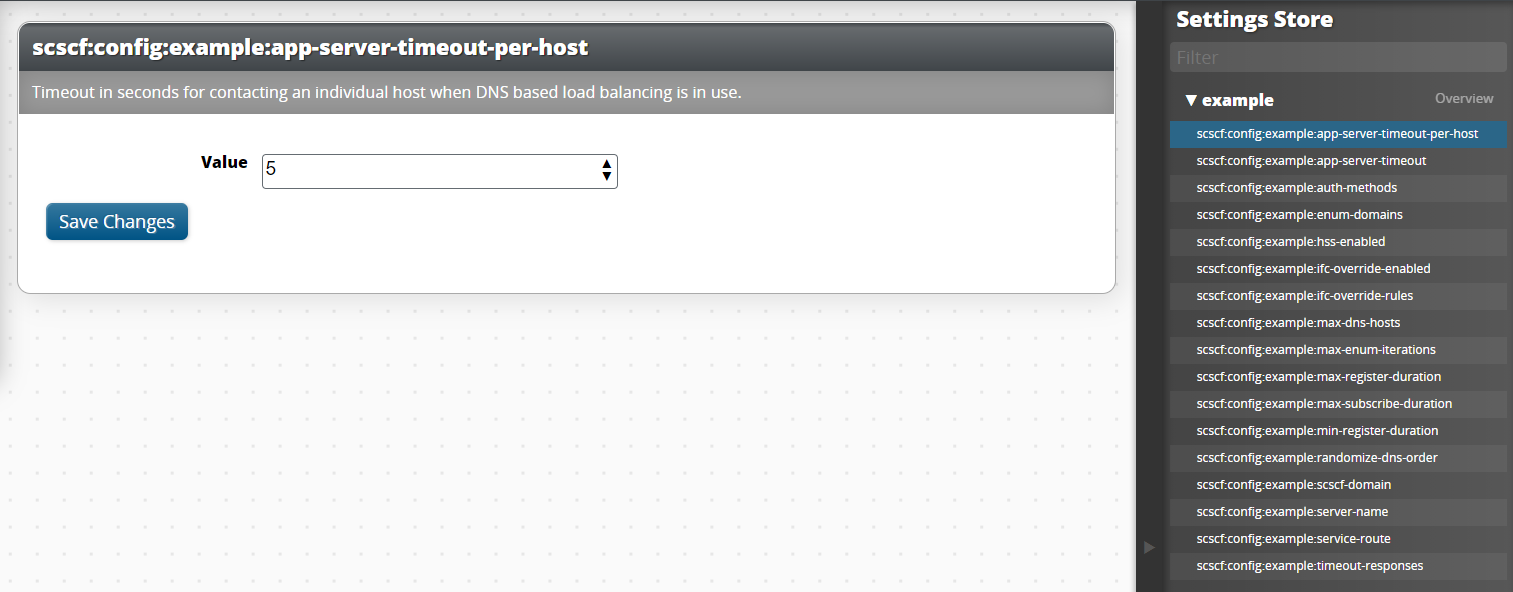
After clicking an element, click an object in the Settings Store list on the right of the screen. The following images are examples of what the web UI may look like after selecting it an object from the list.
This example shows, within the IMS domain “test”, adding a value to the IP-SM-GW element object called destination-npi.

This example shows, withing the IMS domain “example”, adding a value to the I-CSCF element object called blocked-addresses.

This example shows, withing the IMS domain “example”, editing the value to the S-CSCF element object called app-server-timeout-per-host.
Viewing S-CSCF IFCs
If S-CSCF is currently installed, click S-CSCF IFC in the main menu to view existing initial filter criteria.
Note
S-CSCF IFCs can be modified only by the Platform Owner. A Service Provider can only view these IFCs and apply them to their S-CSCF domains in a configuration key.
Managing IP-SM-GW Senders
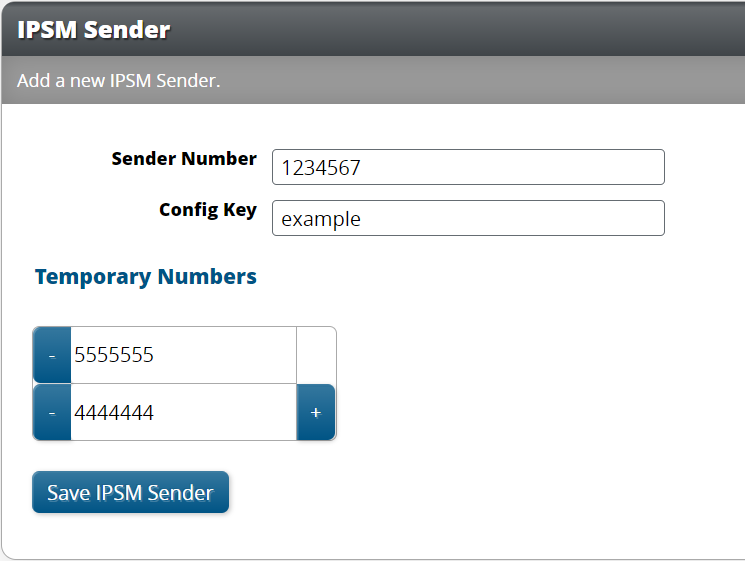
The IP-SM-GW converts SIP messages to text messages, and the sender of these text messages can be configured. If IP-SM-GW is currently installed, click IPSM Sender Rewriting in the main menu to view a list of existing senders.
To Add Senders
Click Add on the task bar.
Enter the sender information in the text boxes.
Setting |
Description |
|---|---|
Sender Number |
The number of the sender. |
Config Key |
The configuration key for the sender. |
Temporary Numbers |
Optional temporary numbers that may also be used by the sender. |
Click Save IPSM Sender.
To Edit Senders
Right-click on the sender to be edited.
Click Edit Sender.
Make the required changes in the text boxes.
Click Save IPSM Sender.
Managing Settings
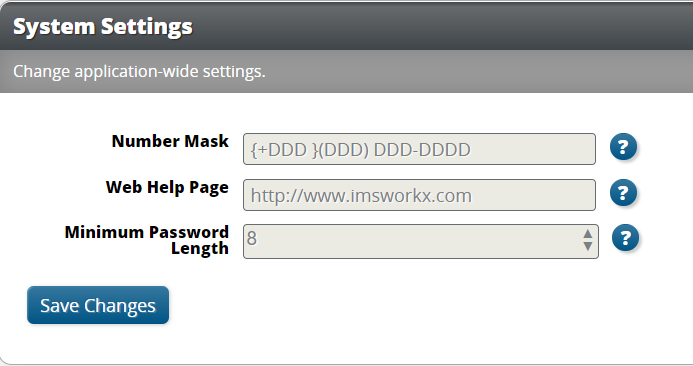
Click Settings in the main menu to view and edit application-wide settings of DND.
Setting |
Description |
|---|---|
Number Mask |
Specifies the default format of added phone numbers. For example, d(ddd)ddd-dddd would format 15551234987 into 1(555)123-4987. |
Web Help Page |
Determines the page to which Service Providers are redirected after selecting Help. |
Minimum Password Length |
The minimum number of characters that a password must be. |
Managing Administrators
Click Administrators in the main menu to view a list of all existing platform owner accounts added.
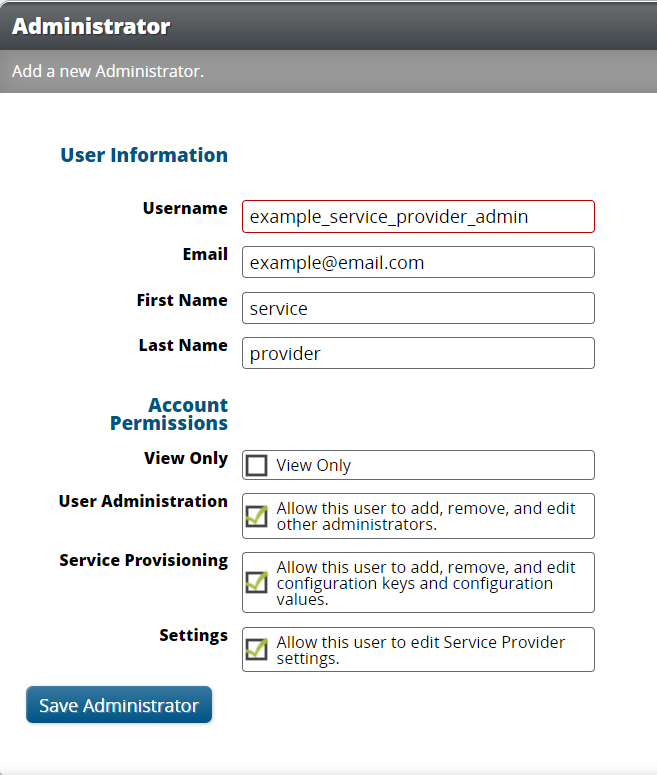
To Add Administrators
Click Add on the task bar.
Enter the user information in the text boxes.
Setting |
Description |
|---|---|
Username |
User name to log in to the default account. Can contain only lowercase characters, numbers, or underscores. |
Notifications and password reset requests are sent to this email address. |
|
First Name |
First name of entity who uses the account. |
Last Name |
Last name of entity who uses the account. |
View Only |
Make this account view only or assign permissions. |
User Administration |
Add, edit, and remove other Platform Owners. |
Service Provisioning |
Add, edit, and remove configuration keys and values. |
Settings |
Edit system-wide application settings. |
Click Save Administrator.
To Edit Administrators
Right-click on the Administrator to be edited.
Click Edit Administrator
Make necessary changes.
Click Save Administrator.
Call Detail Records
Click Call Detail Records in the main menu to view and export CDRs. The type of account and assigned permissions determine the records that are available to view.
Service Providers can see Call Detail Records for all their Subscribers.
