Web-Based User Interface
The ICR web-based user interface (web UI) allows Platform Owners, Service Providers, and Subscribers to populate and maintain the routing rules database, monitor statistics, and manage users in ICR.
Web Browser Requirements
The ICR web UI can be accessed from any of the following web browsers:
Account Roles and Permissions
The type of user account determines the selections available on the main menu, and the permissions assigned to a user further define the tasks that they can perform.
The different roles are defined as:
Platform Owners deploy the network which runs ICR. The Platform Owner is responsible for defining physical egress routes and defining the Service Providers.
Service Providers offer their customers routing features as services. The Service Provider allocates numbers to their users and establishes routing plans for these numbers. The Service Provider is also responsible for defining Subscriber accounts.
Subscribers may be given access to the call plans and routing rules for their numbers.
Each Platform Owner can have the following permissions:
Name |
Permission |
|---|---|
User Administration |
Add, remove and edit other Platform Owners. |
System Provisioning |
View and edit platform settings. |
Service Provisioning |
Add, remove and edit Service Providers. |
Each Service Provider can have the following permissions:
Name |
Permission |
|---|---|
User Administration |
Add, remove and edit other Service Providers. |
System Provisioning |
View and edit service settings. |
Service Provisioning |
Add, remove and edit System Numbers and Subscribers. |
Service Support |
View System Numbers and Subscribers. Reset PINs and Passwords. |
Read Only |
View System Numbers and Subscribers, can not change any information. |
Each Subscriber can have the following permissions:
Name |
Permission |
|---|---|
User Administration |
Add and edit additional web accounts. |
Service Provisioning |
View and edit routing entries. |
Read Only |
View information, can not change any information. |
Note
Permissions that any user has access to may be set on a per-user basis.
Navigating in ICR
This section describes the navigation tools common to ICR pages used by all account types. To see the full list of features a user can access, select one of the options on the left side of the screen to navigate to that section.
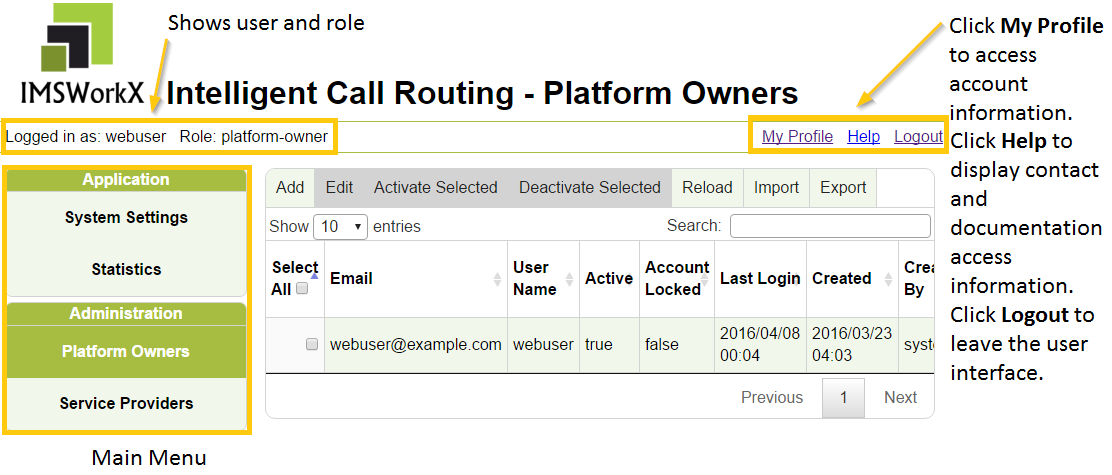
Location on Screen |
Function |
|---|---|
Upper Left |
Shows name and role of current user |
Left |
Click to navigate to other sections of ICR (Main Menu) |
Upper Right |
Click to navigate to Account Profile or to Help page or to log out |
Center |
Shows information or records for the current section of ICR |
The Task Bar
This task bar appears on many ICR pages. The tasks a user is able to perform is determined by the permissions assigned when the user account is created.

The buttons on the task bar provide the functionality described below.
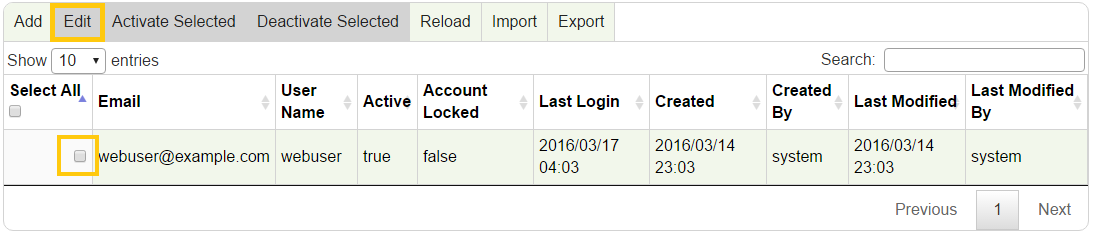
Add - Click to open a page where a user can add (create) records for users, service providers, subscribers, calling plans, or routing rules records.
Edit - Click to open a page where a user can make changes to records that have been selected.
Activate Selected and Deactivate Selected - ICR records are activated when added (created). These records can then be activated or deactivated in groups or one at a time.
Select a record by clicking the check box next to the record.
Tip
Click Select All to select every record in the list displayed on the current page.
Click Activate Selected or Deactivate Selected to apply that action to the selected record(s). The records are immediately activated or deactivated.
Note
ICR records of any kind cannot be deleted, they can be deactivated when not in use.
Reload - Click to reload the list displayed in the page. Any changes that have been made will be visible.
Import and Export - These buttons are used to complete bulk loads of ICR records (users, service providers, subscribers, calling plans, or routing rules).
Using the Web UI as a Platform Owner
Opening the Web UI
In a web browser, connect to the host address of the NIU.
On the Log In page, enter the User Name and Password.
Tip
Click Forgot Password to generate an email message requesting a password reset.
Click Log In. The My Profile page is now displayed.
Note
This page can be accessed from any point in the web UI by clicking My Profile.
Temporary Password
When a user signs in for the first time, the password used is temporary. Once signed in, the user will be prompted to change the password. This will only happen once and will not happen if the password is reset by another user.
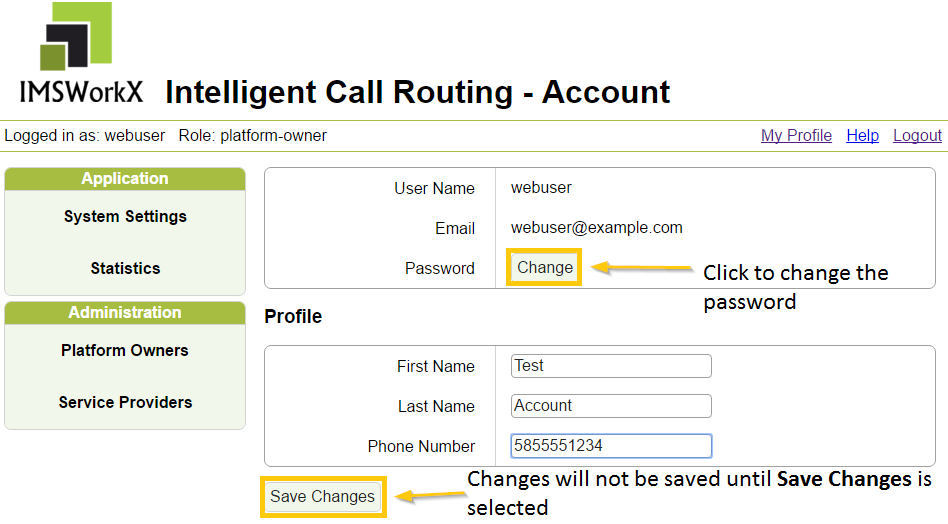
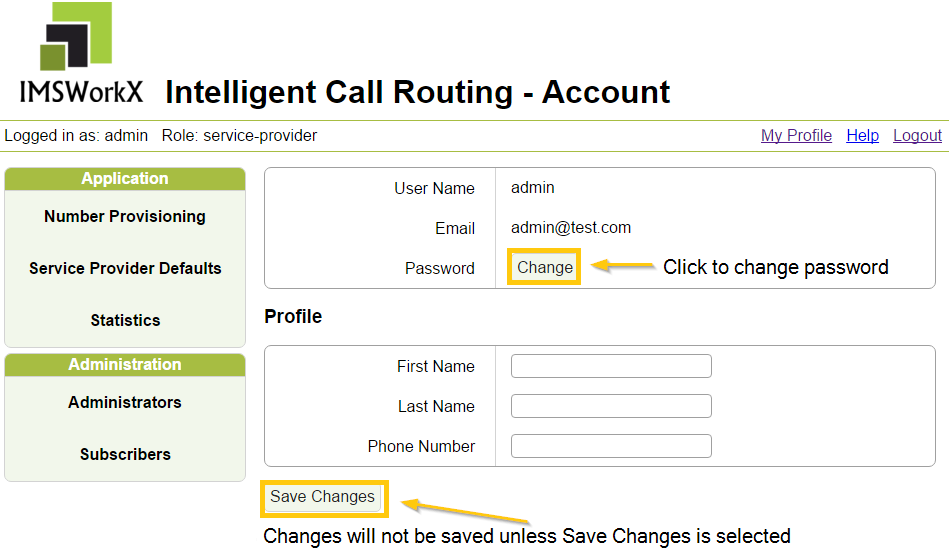
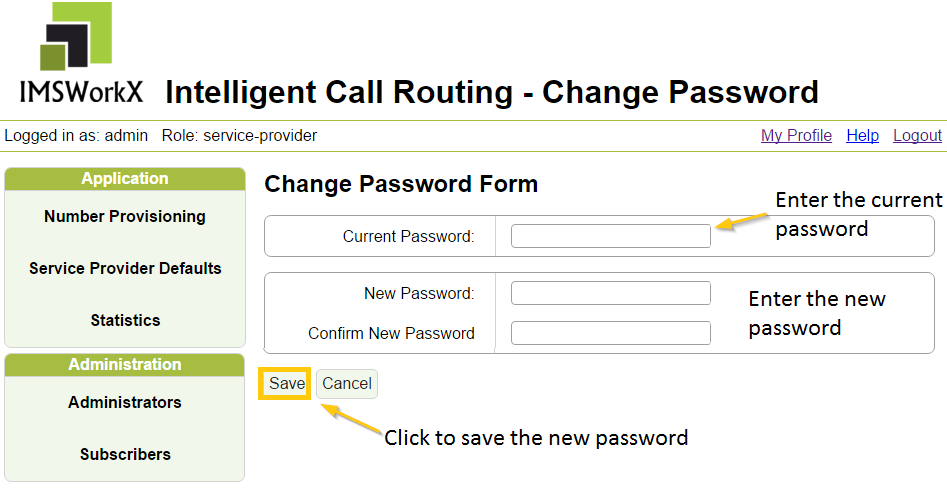
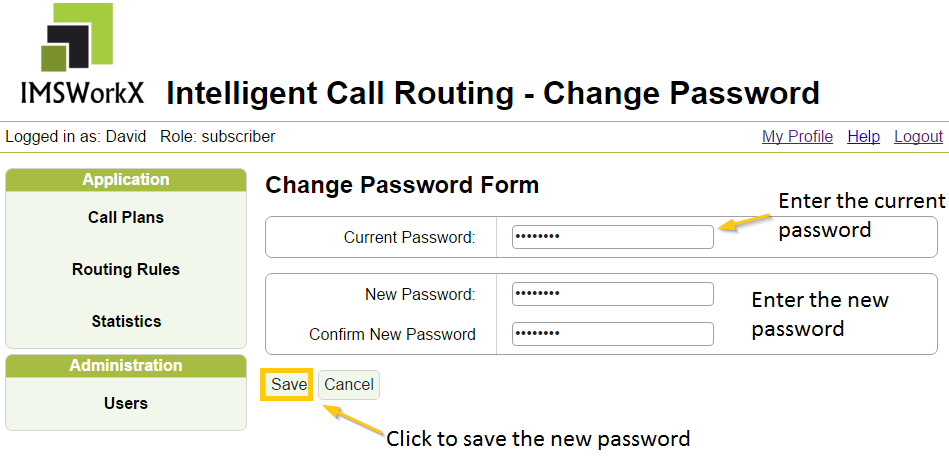
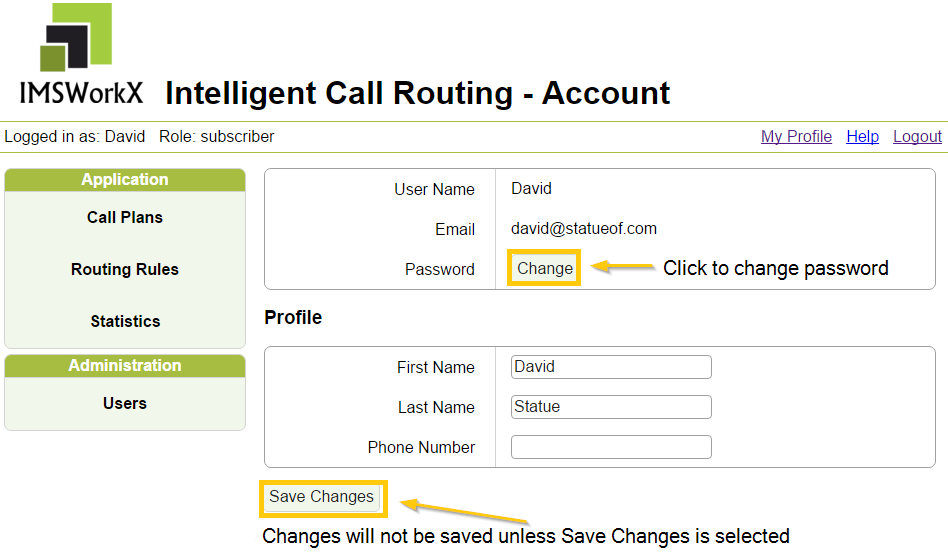
Changing the Password
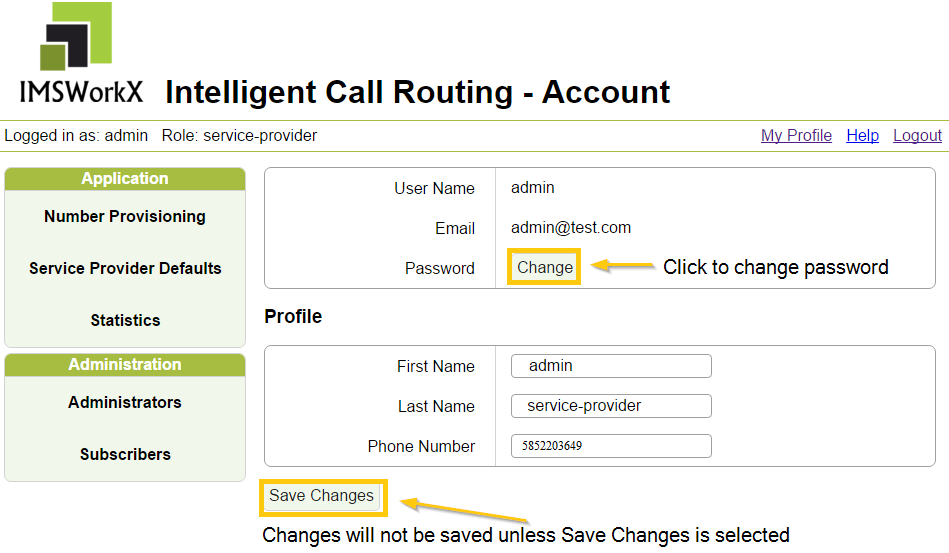
Click Change in the Password field to enter the new password information.
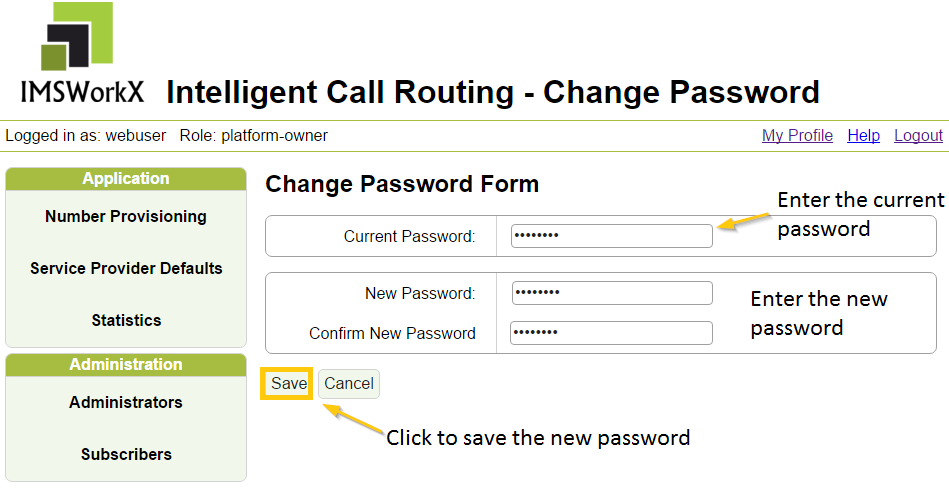
Tip
The password must be a minimum of 8 characters and a maximum of 16 characters long.
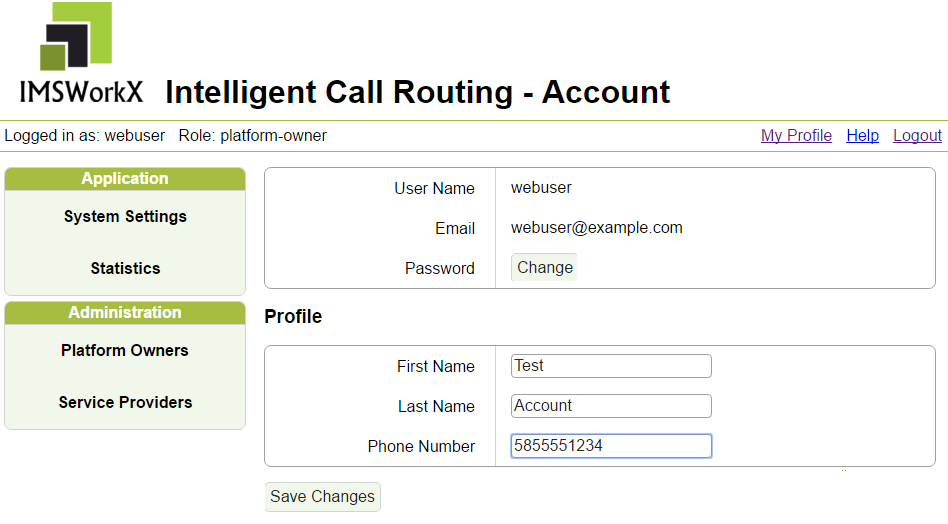
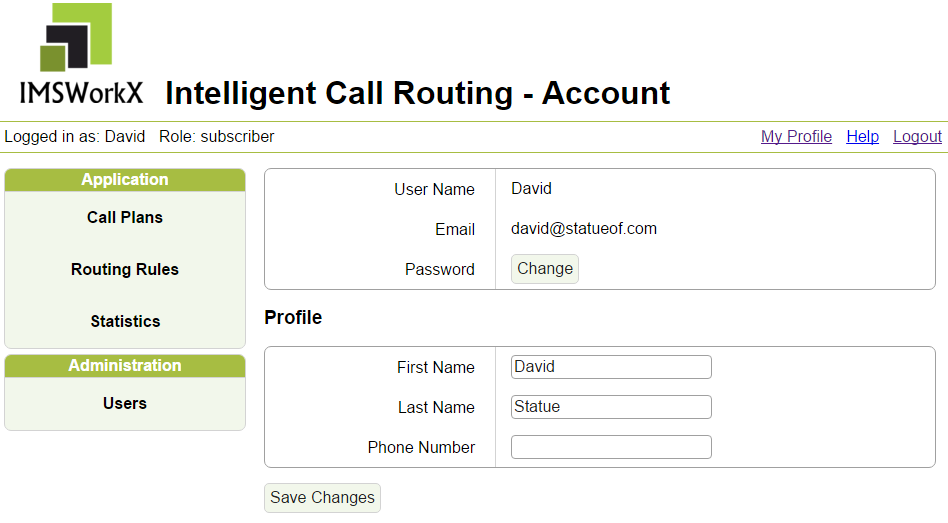
Managing Account Information
From the My Profile page, a user can manage account information. This page displays after logging in and when My Profile is selected in the top, right corner.
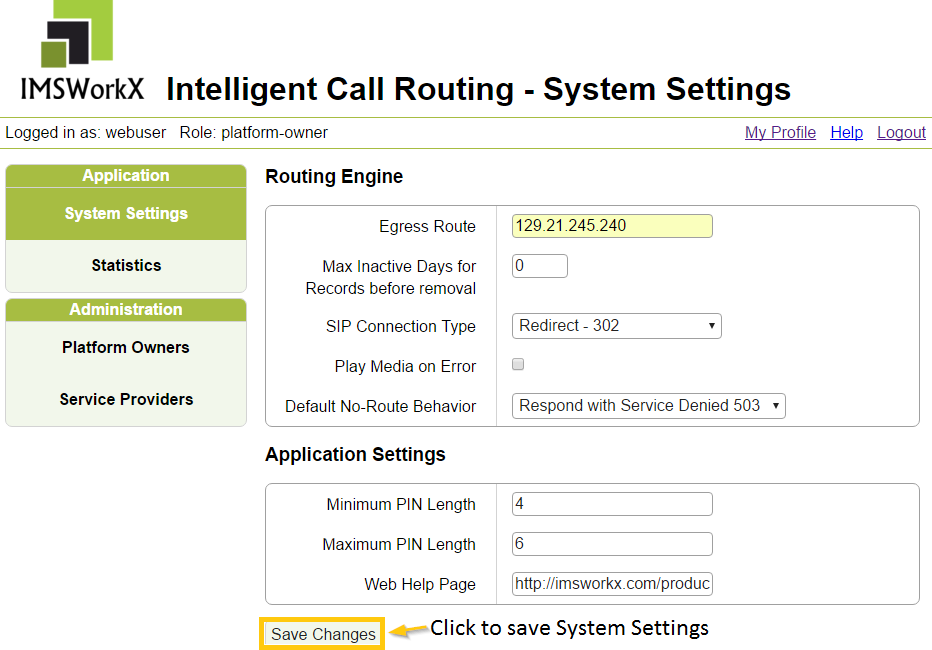
System Settings
In System Settings, the Platform Owner configures the behavior of ICR features that are dependent on specific deployment.
Setting |
Description |
|---|---|
Egress Route |
Specifies the hostname or IP address used in the redirection or connection of SIP calls. If the call is completed using a 302 redirect the host part of the SIP URI placed in the contact header will be the value set for the egress route. When this setting is left blank the hostname or IP address in the SIP URI of the Contact header from the initiating INVITE is used. |
Max Inactive Days for Records Before Removal |
ICR will remove records that have been inactive longer than this value every night at midnight, where midnight is determined by the time on the active niu. A value of zero will never remove inactive records. |
SIP Connection Type |
|
Play Media on Error |
Configures the routing engine to connect calls to a local media endpoint and play the announcement “A system error has occurred” when an error in the routing engine occurs. This only applies to SIP calls. |
Default No Route Behavior |
Sets the default behavior for SIP calls when no route is found for the call. The options available directly correspond to SIP final response codes. If 302 is selected a SIP URI of where to redirect the call must also be provided. |
Minimum PIN Length |
The minimum length users can set the PIN |
Maximum PIN Length |
The maximum length users can set the PIN |
Web Help Page |
Determines the page to which customers are redirected after selecting Help. |
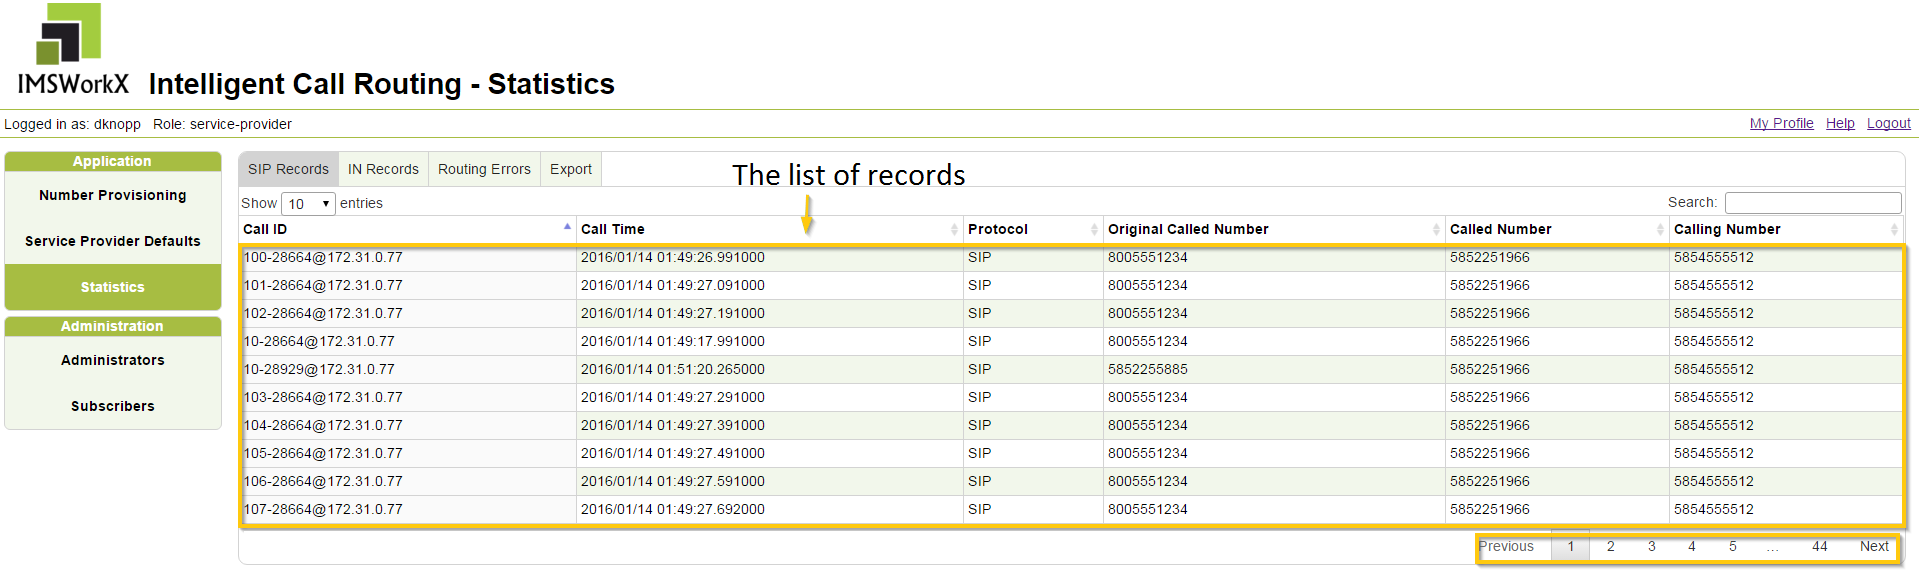
Viewing Statistics
Click Statistics on the main menu to open a page with tabs that let the user view Call Detail Records and Routing Errors. The type of account and assigned permissions determine the records available for viewing.
Platform Owners can view statistics for all services they host.
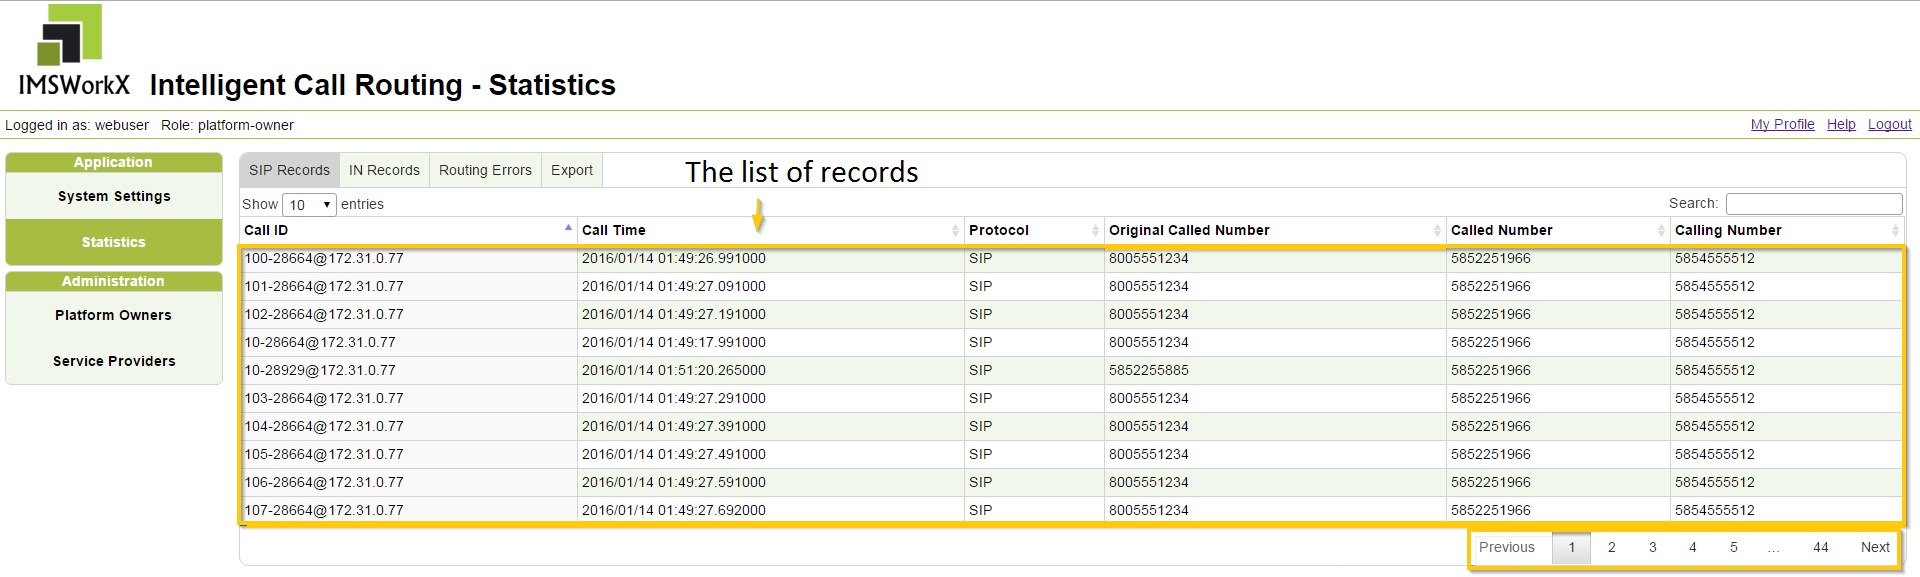
The task bar on this page has the following functions:
SIP Records show CDRs for calls that are routed via Session Initiation Protocol.
IN Records shows CDRs for calls that are routed via Intelligent Network Messaging.
Routing Errors shows all errors from calls.
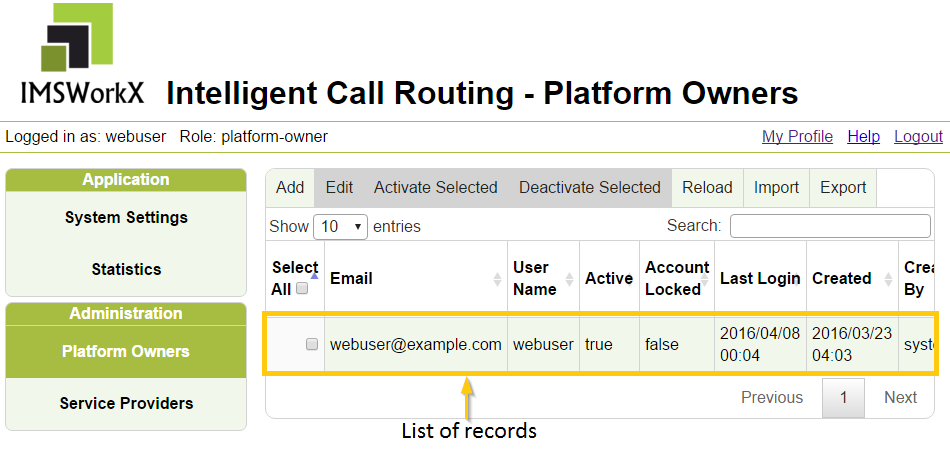
Managing Platform Owners
Click Platform Owners on the main menu to open a list of all Platform Owners added to ICR.
To Add Platform Owners
Click Add on the task bar.

Enter the user information in the text boxes. Select the Account Settings for the Platform Owner.
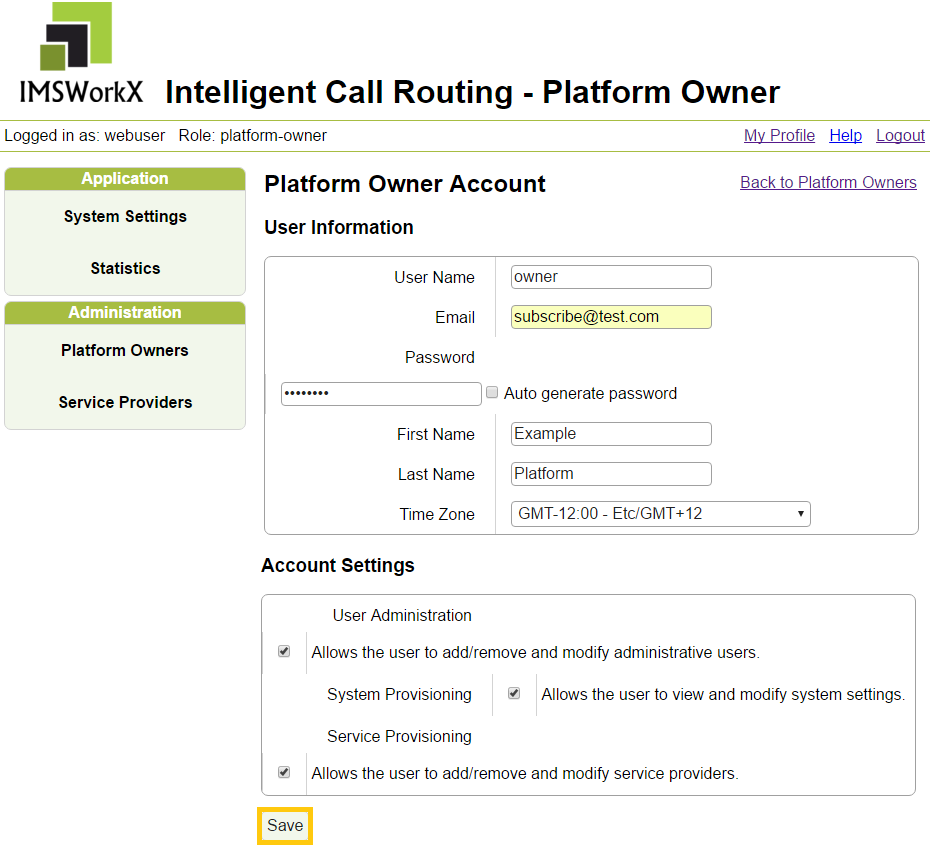
Setting |
Description |
|---|---|
User Name |
Name used to log in to ICR. |
Email address which receives notifications and password reset requests. |
|
Password |
Temporary password to log in the first time. Can be automatically generated. |
First Name |
First name of entity who uses the account. |
Last Name |
Last name of entity who uses the account. |
Time Zone |
Time Zone for the new user. |
User Administration |
Allows the user to add/remove and modify other Platform Owner users. |
System Provisioning |
Allows the user to view and modify system settings. |
Service Provisioning |
Allows the user to add/remove and modify Service Providers. |
Click Save to have the changes take effect.
Note
The fields in the Modification Log are automatically populated when the record is saved. This Modification Log continues to track the changes made to this record.
To Edit Platform Owners
Select the Platform Owner to be edited by selecting the checkbox.
Click Edit on the task bar.
Make the required changes to the user information.
Click Save to have the changes take effect.
Managing Service Providers
Click Service Providers on the main menu to open a list of all service providers added to ICR.
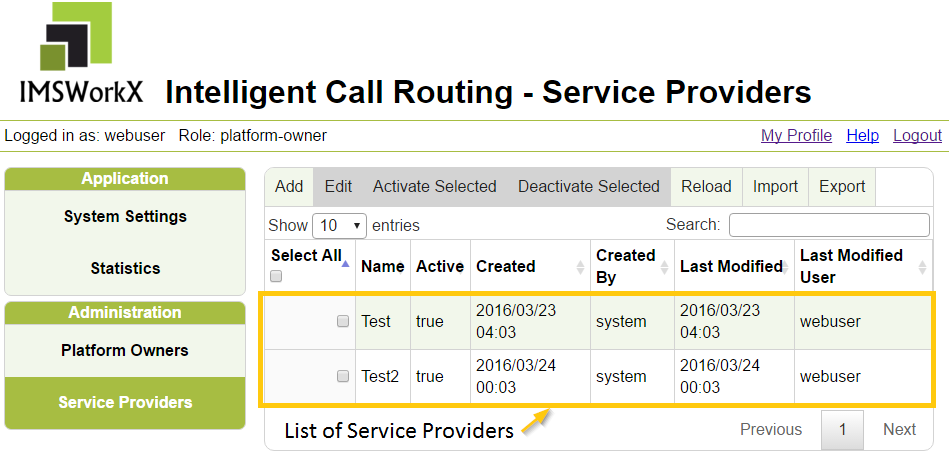
To Add Service Providers
Click Add on the task bar.
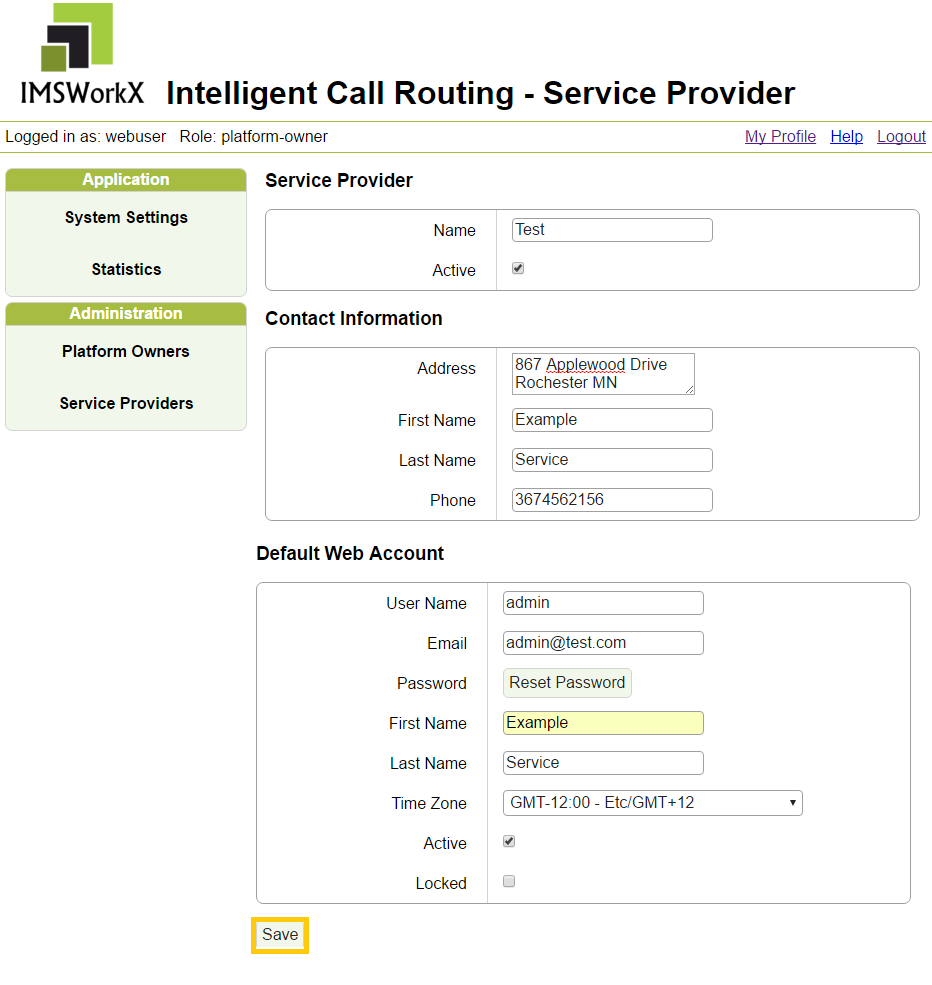
Enter the Name and Address information in the text boxes. Click the Active checkbox to have the service provider be active as soon as the information is saved.
Enter the Default Web Account information. Once signed in as the default additional users can be created.
Setting |
Description |
|---|---|
Name |
Name of the Service Provider |
Active |
Shows if the account is active or inactive. |
Address |
Physical address of the Service Provider |
First Name (Contact) |
First name of the person who is the primary contact of the account. |
Last Name (Contact) |
Last name of the person who is the primary contact of the account. |
Phone |
Primary phone number of the contact. |
User Name |
Name used to log in to ICR. |
Email address which receives notifications and password reset requests. |
|
Password |
Temporary password to log in the first time. Can be automatically generated. |
First Name |
First name of entity who uses the account. |
Last Name |
Last name of entity who uses the account. |
Time Zone |
Time Zone for the new user. |
Active |
Shows if the web account is active or inactive. |
Locked |
Shows if the Web Account is locked or unlocked. |
Click Save to have the changes take effect.
Note
The fields in the Modification Log are automatically populated when the record is saved. This Modification Log continues to track the changes made to this record.
To Edit Service Providers
Select the Service Provider to be edited by selecting the checkbox.
Click Edit on the task bar.
Make the required changes in the text boxes.
Click Save to have the changes take effect.
Using the Web UI as a Service Provider
Opening the Web UI
In a web browser, connect to the host address of the NIU.
On the Log In page, enter the User Name and Password.
Tip
Click Forgot Password to generate an email message requesting a password reset.
Click Log In. The My Profile page is now displayed.
Note
This page can be accessed from any point in the web UI by clicking My Profile.
Temporary Password
When a user signs in for the first time, the password used is temporary. Once signed in, the user will be prompted to change the password. This will only happen once and will not happen if the password is reset by another user.
Changing the Password
Click Change in the Password field to enter the new password information.
Tip
The password must be a minimum of 8 characters and a maximum of 16 characters long.
Managing Account Information
From the My Profile page, a user can manage account information. This page displays at login and when My Profile is selected in the top, right corner.
Number Provisioning
Click Number Provisioning on the main menu to open a list of all numbers that have been provisioned in ICR.

The task bar on this page has the following functions:
Unlock Selected and Lock Selected - These buttons are used to lock and unlock numbers. A locked number is still active but can not be used.
Reset Password/PIN - Click to reset the PIN of the number selected.
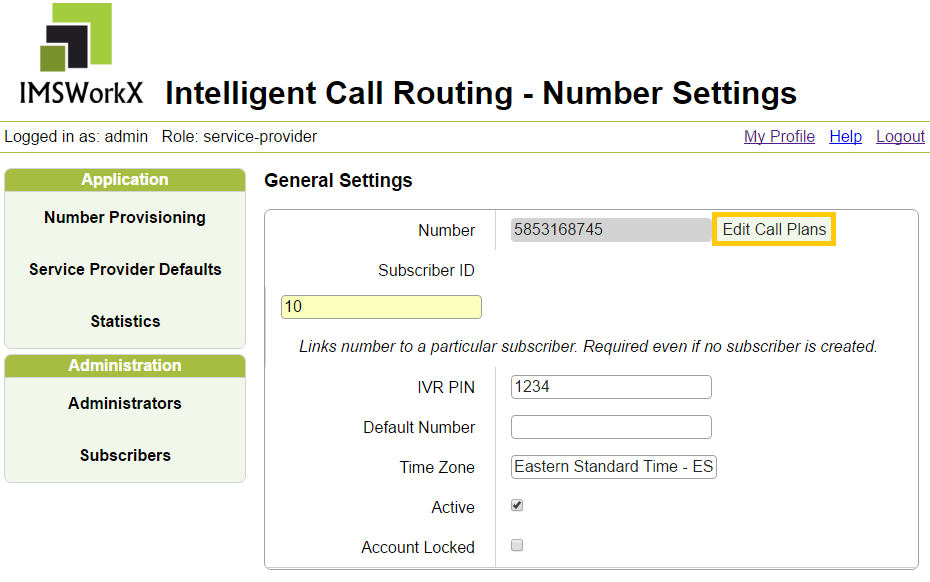
To Add Numbers
Click Add on the task bar.

Enter the Number, Subscriber ID, IVR PIN, Default number, Time Zone, and Routing Constraints. Click the Active checkbox to have the number be active as soon as the information is saved.

Setting |
Description |
|---|---|
Number |
Phone number to be provisioned. |
Subscriber ID |
Identification number for subscriber who has the provisioned number. |
IVR PIN |
Personal Identification Number to access IVR. |
Default Number |
Number calls are routed to if no other call plans are active. |
Time Zone |
Time Zone for the user. |
Active |
Shows if the account is active or inactive. |
Account Locked |
Shows if the account is locked or unlocked. |
Use Service Provider Constraints |
Uses Routing Constraints set by the Service Provider Defaults. |
Require North American Number |
Require that any number destination provided in a call plan is a North American number. |
Block International |
Block destinations in call plans that are international. |
Block 700 |
Block destinations in call plans that are 700xxxxxxx style numbers. |
Block 9xx |
Block destinations in call plans that are toll numbers. |
Block 8xx |
Block destinations in call plans that are toll free numbers. |
Block n11 |
Block destinations in call plans that are service numbers such as 911. |
Carrier Selection |
Sets the Carrier selection for the Carrier parameter provided in responses to AIN triggers. |
Nature of Carrier |
Sets the Nature of Carrier for the Carrier parameter provided in responses to AIN triggers. |
Digits |
Sets the digits for the Carrier parameter provided in responses to AIN triggers |
Click Save to have the changes take effect.
To Edit Numbers
Select the number to be edited by selecting the checkbox.

Click Edit on the task bar.
Make the required changes in the text boxes.
Click Save to have the changes take effect.
Call Plans
To Add Call Plans
Click Edit Call Plans when editing a provisioned number. This brings the user to the Call Plan Page.
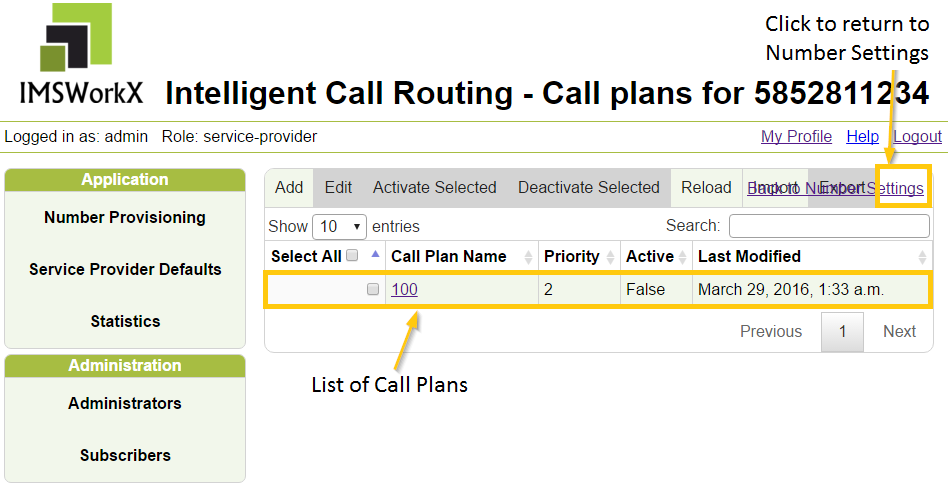
Click Add on the task bar.

Enter the Plan Name, Priority and Call Rules. Click the Active checkbox to have the call plan active as soon as the information is saved.
Setting |
Description |
|---|---|
Plan Name |
Name of the Call Plan |
Priority |
The order in which Call Plans will be processed; 1 processes first. |
Active |
Shows if the account is active or inactive. |
The rules added to the call plan can be modified based on the following properties:
Rule |
Description |
|---|---|
Forward Call |
Forwards the call to a Destination. |
Time of Day |
Routes the call based on time. |
Day of Week |
Routes the call based on the day. |
Event |
Routes calls bsed on a date or date range. |
Percent Allocation |
Routes calls to multiple Destinations based on the allocation specified. |
Calling Match |
Routes the call based on phone number. X can be used as a wildcard. |
Calling NPA |
Routes calls based on the three digit area code. |
Destination |
Description |
|---|---|
Number |
The destination is a telephone number. |
SIP URI |
The destination is a SIP endpoint. Provide the full SIP URI required in the input field when selecting this option. For example, sip:service2@network-services.net. |
Trunk Group |
The destination is a trunk group. The called number and egress route stay the same; however, the signaling instructs the next network elements in the call to send the call over the indicated trunk group. |
Trunk Group with Outpulse |
The destination is a trunk group. The address information does change. |
Hang Up |
End the call. |
Rule Set |
Add child rules that determine destination. |
Preconfigured Destination |
The destination is a complex destination that has been defined and then imported into ICR. |
Click Save to have the changes take effect.
To Edit Call Plans
Click Edit Call Plans when editing a provisioned number.
Click Edit on the task bar.
Make the required changes to the text boxes and rules.
Click Save to have the changes take effect.
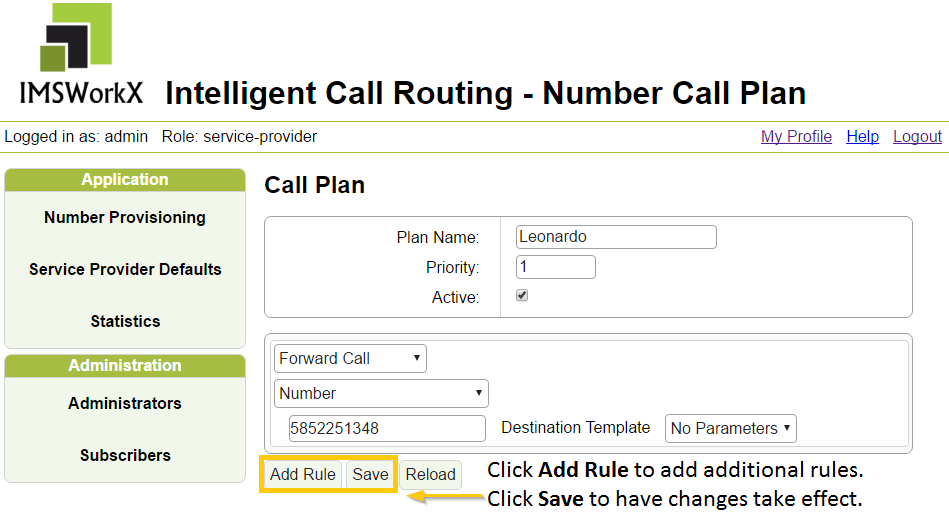
Using Digit Maps in Call Plans and Routing Rules
The character X can be used in call plan destination numbers and routing rule called numbers to provide additional flexibility.
In this example call plan, the XXXX acts as a mask to forward the incoming call to a number that matches the dialed number. For example, this call plan had someone call 800-586-1212 which will then forward the call to 585-649-1212.
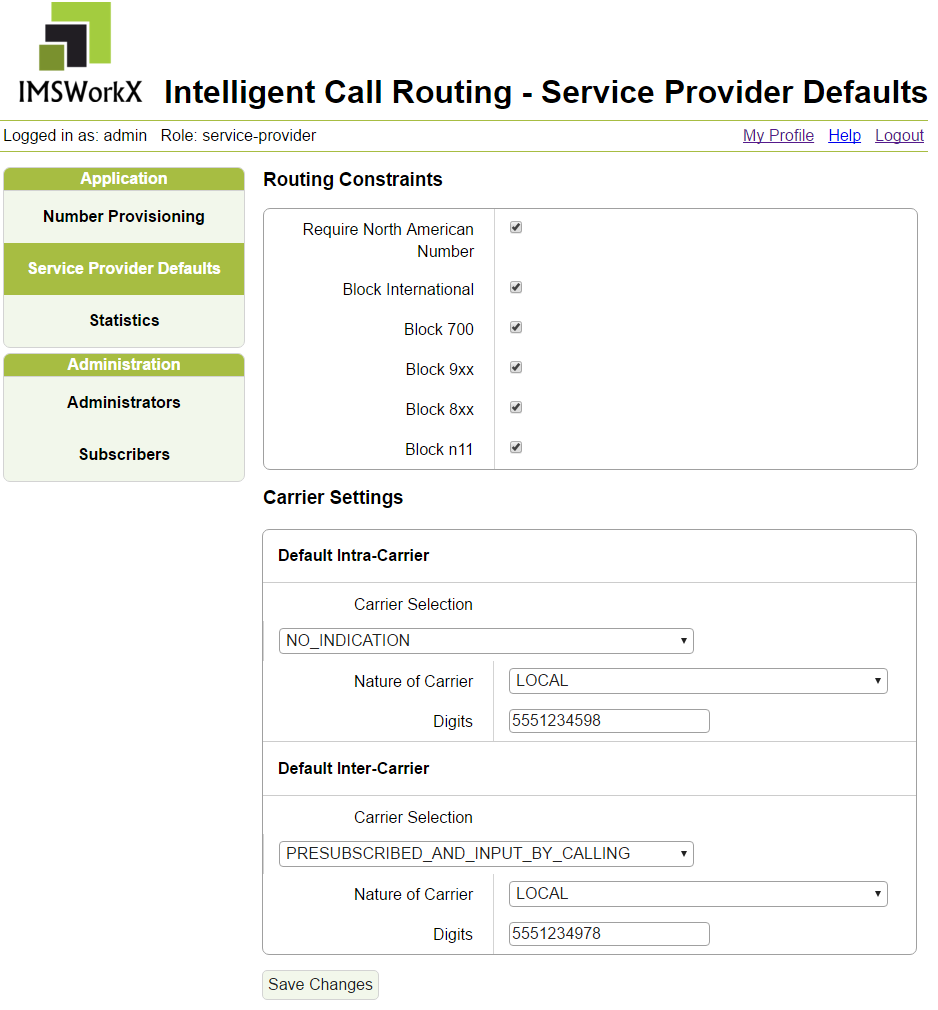
Service Provider Defaults
In Service Provider Defaults, the Service Provider configures the behavior of ICR features for Subscribers.
Setting |
Description |
|---|---|
Require North American Number |
Require that any number destination provided in a call plan is a North American number. |
Block International |
Block destinations in call plans that are international. |
Block 700 |
Block destinations in call plans that are 700xxxxxxx style numbers. |
Block 9xx |
Block destinations in call plans that are toll numbers. |
Block 8xx |
Block destinations in call plans that are toll free numbers. |
Block n11 |
Block destinations in call plans that are service numbers such as 911. |
Carrier Selection |
Sets the Carrier selection for the Carrier parameter provided in responses to AIN triggers. |
Nature of Carrier |
Sets the Nature of Carrier for the Carrier parameter provided in responses to AIN triggers. |
Digits |
Sets the digits for the Carrier parameter provided in responses to AIN triggers |
Tip
Depending on permissions, a user may not be able to make changes to these settings.
Viewing Statistics
Click Statistics on the main menu to open a page with tabs that lets the user view Call Detail Records and Routing Errors. The type of account and assigned permissions determine the records available for viewing.
Service providers can view statistics for all subscriber services.
The task bar on this page has the following functions:
SIP Records show CDRs for calls that are routed via Session Initiation Protocol.
IN Records shows CDRs for calls that are routed via Intelligent Network Messaging.
Routing Errors shows all errors from calls.
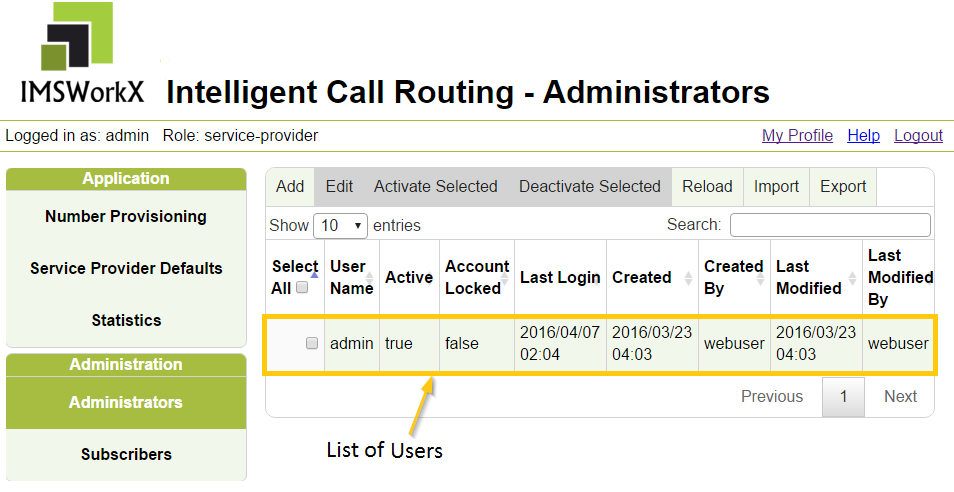
Managing Administrators
Click Administrators on the main menu to open a list of all administration accounts linked to the current user.
To Add Administrators
Click Add on the task bar.
Enter the Name and Address information in the text boxes. Click the Active checkbox to have the service provider be active as soon as the information is saved.
Enter the Default Web Account information. Once signed in as the default additional users can be created.

Setting |
Description |
|---|---|
User Name |
Name used to log in to ICR. |
Email address which receives notifications and password reset requests. |
|
Password |
Temporary password to log in the first time. Can be automatically generated. |
First Name |
First name of entity who uses the account. |
Last Name |
Last name of entity who uses the account. |
Time Zone |
Time Zone for the new user. |
User Adminiatration |
Add, remove and modify other Service Provider users. |
System Provisioning |
View and edit service settings. |
Service Provisioning |
Add, remove and edit system Numbers and Subscribers. |
Service Support |
View System Numbers and Subscribers. Reset PINs and Passwords. |
Read Only |
View System Numbers and Subscribers. |
Click Save to have the changes take effect.
Note
The fields in the Modification Log are automatically populated when the record is saved. This Modification Log continues to track the changes made to this record.
To Edit Administrators
Select the Service Provider to be edited by selecting the checkbox.
Click Edit on the task bar.
Make the required changes in the text boxes.
Click Save to have the changes take effect.
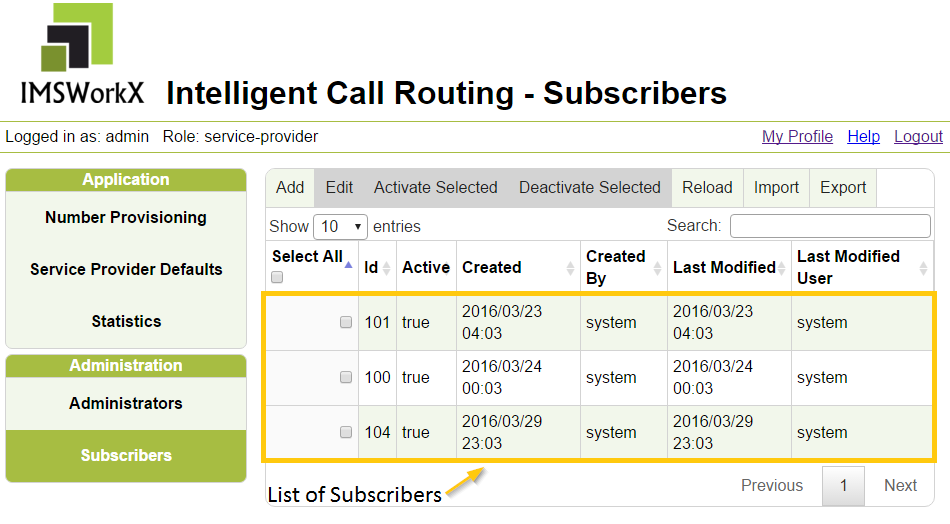
Managing Subscribers
Click Subscribers on the main menu to open a list of all subscribers added to ICR linked to the current user.
To Add Subscribers
Click Add on the task bar.
Enter the Name and Address information in the text boxes. Click the Active checkbox to have the service provider be active as soon as the information is saved.
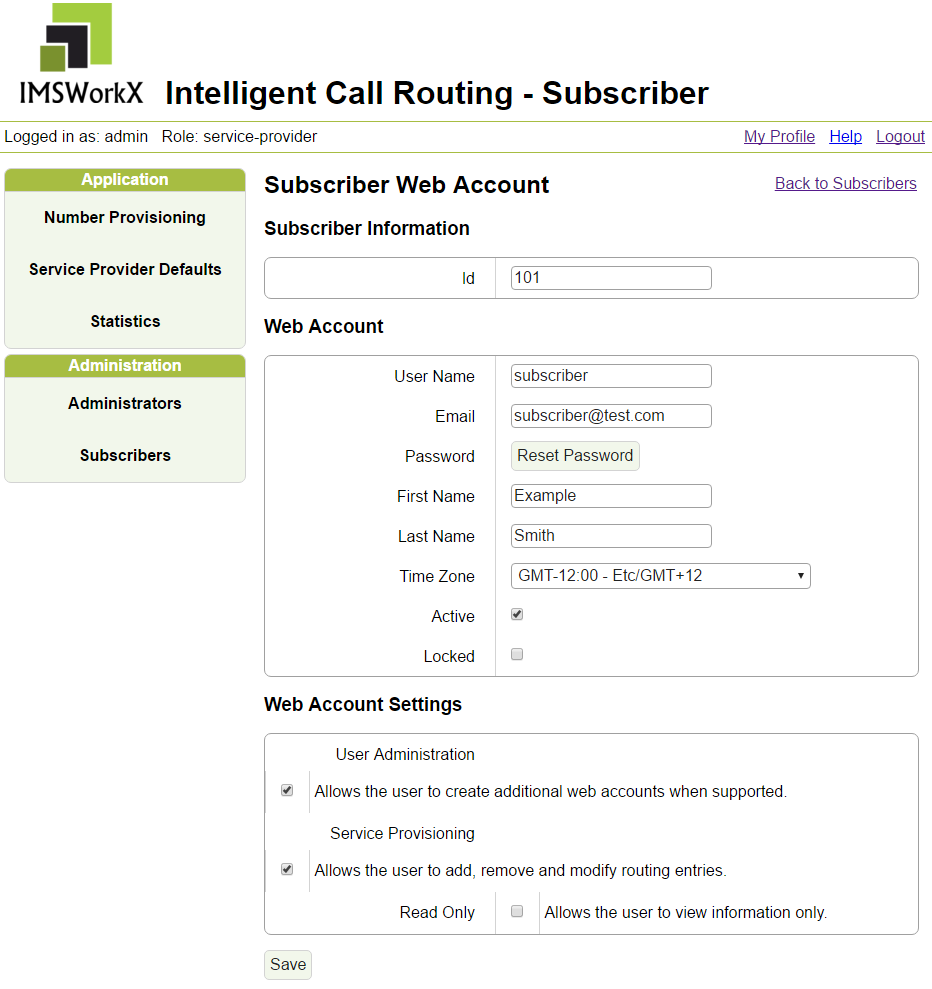
Setting |
Description |
|---|---|
User Name |
Name used to log in to ICR. |
Email address which receives notifications and password reset requests. |
|
Password |
Temporary password to log in the first time. Can be automatically generated. |
First Name |
First name of entity who uses the account. |
Last Name |
Last name of entity who uses the account. |
Time Zone |
Time Zone for the new user. |
Active |
Shows if the account is active or inactive. |
Locked |
Shows if the Web Account is locked or unlocked. |
User Administration |
Add, remove and edit other Service Providers. |
Service Provisioning |
Add, remove and edit system Numbers and Subscribers. |
Read Only |
View System Numbers and Subscribers. |
Click Save to have the changes take effect.
Note
The fields in the Modification Log are automatically populated when the record is saved. This Modification Log continues to track the changes made to this record.
To Edit Subscribers
Select the Subscriber to be edited by selecting the checkbox.
Click Edit on the task bar.
Make the required changes in the text boxes.
Click Save to have the changes take effect.
Using the Web UI as a Subscriber
Opening the Web UI
In a web browser, connect to the host address of the NIU.
On the Log In page, enter the User Name and Password.
Tip
Click Forgot Password to generate an email message requesting a password reset.
Click Log In. The My Profile page is now displayed.
Note
This page can be accessed from any point in the web UI by clicking My Profile.
Temporary Password
When a user signs in for the first time, the password used is temporary. Once signed in, the user will be prompted to change the password. This will only happen once and will not happen if the password is reset by another user.
Changing the Password
Click Change in the Password field to enter the new password information.
Tip
The password must be a minimum of 8 characters and a maximum of 16 characters long.
Default User Accounts
A default user account is supplied by the Service Provider. After the user is signed in, they can create additional users.
Managing Account Information
From the My Profile page, a user can manage account information. This page displays at login and when My Profile is selected in the top, right corner.
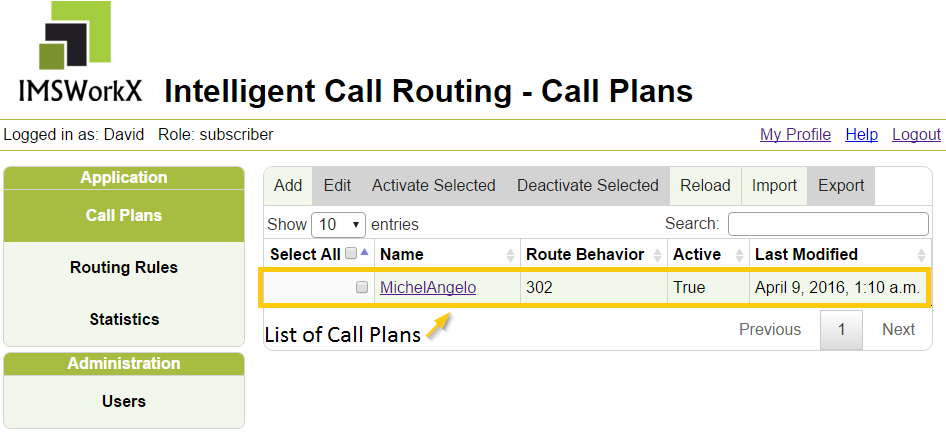
Managing Call Plans
Call plan records determine how an incoming call is handled based on criteria selected by the Subscriber.
The routing rules in a call plan are evaluated from the top down until a rule is processed.
Click Call Plans on the main menu to open a list of all call plan records currently defined in ICR.
To Add a Call Plan
Click Add on the task bar.
Enter the Plan Name, Priority and Call Rules. Click the Active checkbox to have the call plan active as soon as the information is saved.
Setting |
Description |
|---|---|
Plan Name |
Name of the Call Plan |
Priority |
The order in which Call Plans will be processed; 1 processes first. |
Active |
Shows if the account is active or inactive. |
The rules added to the call plan can be modified based on the following properties:
Rule |
Description |
|---|---|
Forward Call |
Forwards the call to a Destination. |
Time of Day |
Routes the call based on time. |
Day of Week |
Routes the call based on the day. |
Event |
Routes calls bsed on a date or date range. |
Percent Allocation |
Routes calls to multiple Destinations based on the allocation specified. |
Calling Match |
Routes the call based on phone number. X can be used as a wildcard. |
Calling NPA |
Routes calls based on the three digit area code. |
Destination |
Description |
|---|---|
Number |
The destination is a telephone number. |
SIP URI |
The destination is a SIP endpoint. Provide the full SIP URI required in the input field when selecting this option. For example, sip:service2@network-services.net. |
Trunk Group |
The destination is a trunk group. The called number and egress route stay the same; however, the signaling instructs the next network elements in the call to send the call over the indicated trunk group. |
Trunk Group with Outpulse |
The destination is a trunk group. The address information does change. |
Hang Up |
End the call. |
Rule Set |
Add child rules that determine destination. |
Preconfigured Destination |
The destination is a complex destination that has been defined and then imported into ICR. |
Click Save to have the changes take effect.
Note
When a call plan record is saved, it is automatically activated and a Modification Log is created and displayed. This log tracks changes made to the record.
Tip
If needed, click Reload to roll back all unsaved changes.
To Edit Call Plans
Select the call plan to be edited by selecting the checkbox.

Click Edit on the task bar. The call plan opens.
Make the required changes in the text boxes. The user can add rules or make changes to existing rules.
If needed, click Reload to roll back all unsaved changes.
Click Save to have the changes take effect.
Tip
Editing and saving a deactivated call plan does not activate it. Deactivated call plans must be activated in a separate action.
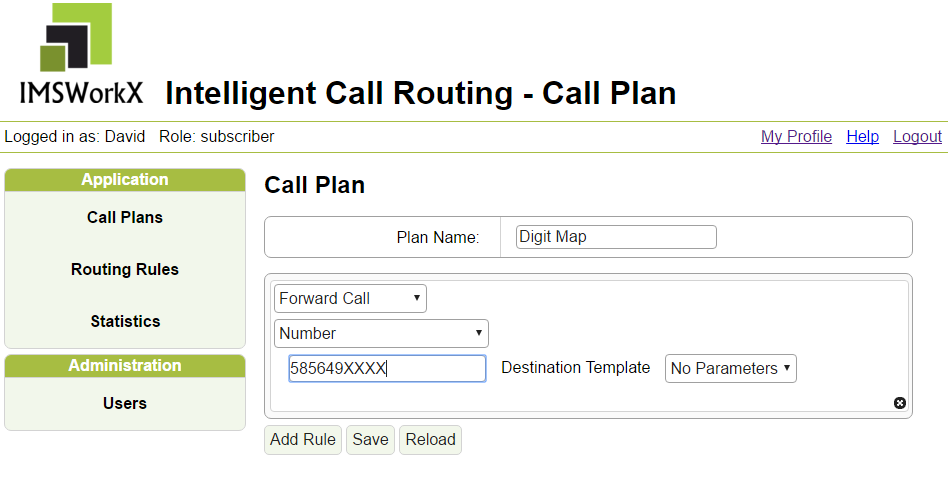
Adding Call Plans with Rule Set Destinations
The character X can be used in call plan destination numbers and routing rule called numbers to provide additional flexibility.
In this calling plan, the XXXX acts as a mask to forward the incoming call to a number that matches the dialed number. For example, this call plan had someone call 800-586-1212 which will then forward the call to 585-649-1212.
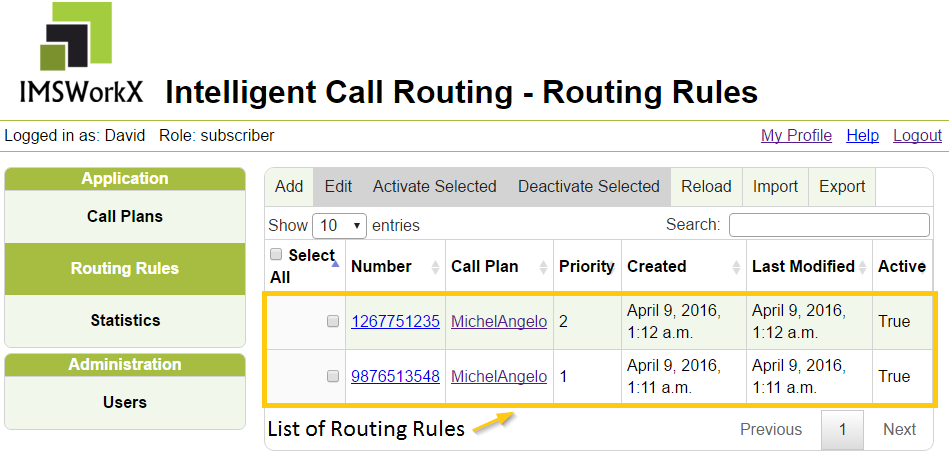
Managing Routing Rules
Click Routing Rules on the main menu to open a list of all routing rule records in ICR.
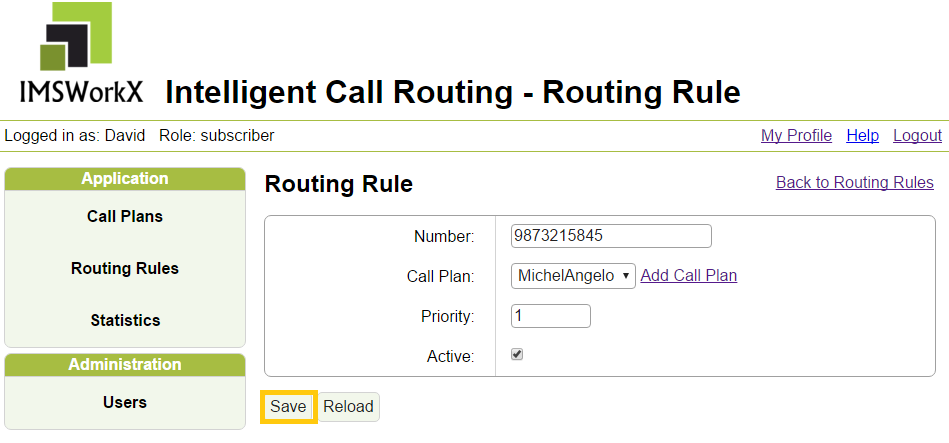
To Add Routing Rules
Click Add on the task bar.
Enter the number to which the call plan is to be assigned.
Select the call plan from the drop-down list. Enter a Priority for the routing rule in the text box, with a value of 1 being the highest priority.
Tip
Click Add Call Plan to open the window to create a new call plan. Once added, the user can return to the Routing Rule window and select this new call plan from the drop-down list.
Click the Active checkbox to make the routing rule effective as soon as it is saved. If this checkbox is not selected, the routing rule is deactivated and can be activated in a separate action.
Setting |
Description |
|---|---|
Number |
Number to be routed. |
Call Plan |
Call plan number follows while being routed. |
Priority |
The order in which Routing Rules will be processed; 1 processes first. |
Active |
Shows if the Routing Rule is active or inactive. |
If needed, click Reload to roll back all unsaved changes.
Click Save to have the changes take effect.
To Edit Routing Rules
Select the routing rule to be edited by selecting the checkbox.

Click Edit on the task bar. The routing rule opens.
Make the required changes to the Number, Call Plan assigned or Priority.
Click the Active checkbox to change the status.
If needed, click Reload to roll back all unsaved changes.
Click Save to have the changes take effect.
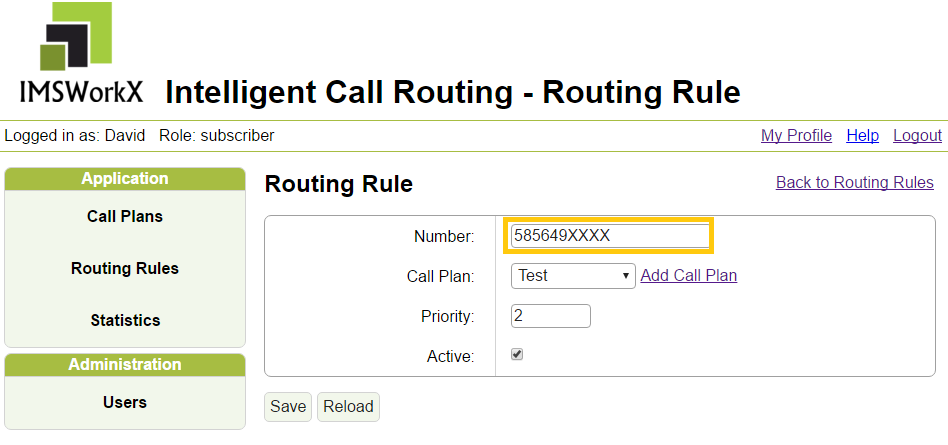
Using Digit Maps in Routing Rules
The character X can be used in call plan destination numbers and routing rule called numbers to provide additional flexibility.
In this example, any calling number that starts with 585-649 will be routed according to call plan Test. Any other calling number will continue down the list of routing rules until it is routed.
Viewing Statistics
Click Statistics on the main menu to open a page with tabs that lets the user view Call Detail Records and Routing Errors. The type of account and assigned permissions determine the records available for viewing.
Subscribers can view statistics only for their services.
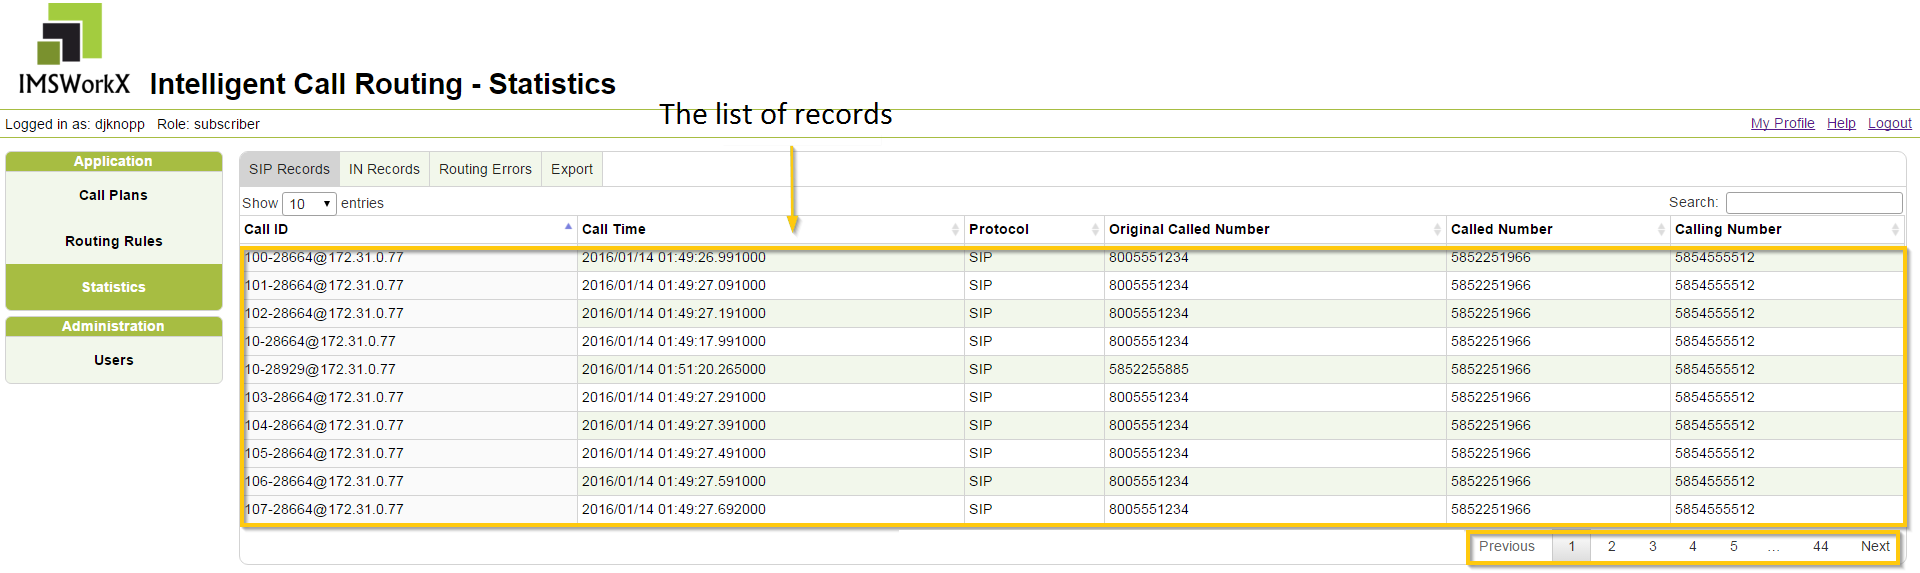
The task bar on this page has the following functions:
SIP Records show CDRs for calls that are routed via Session Initiation Protocol.
IN Records shows CDRs for calls that are routed via Intelligent Network Messaging.
Routing Errors shows all errors from calls.
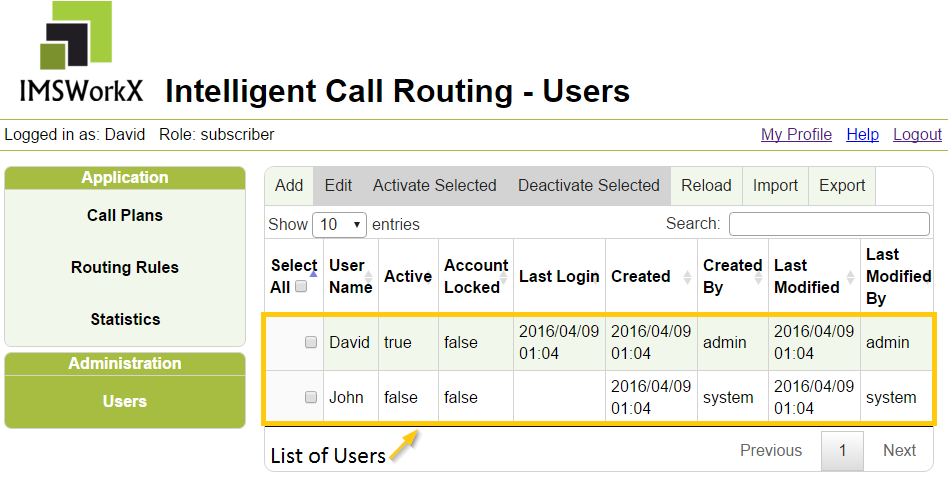
Managing Users
Click Users on the main menu to open a list of all web accounts.
To Add Users
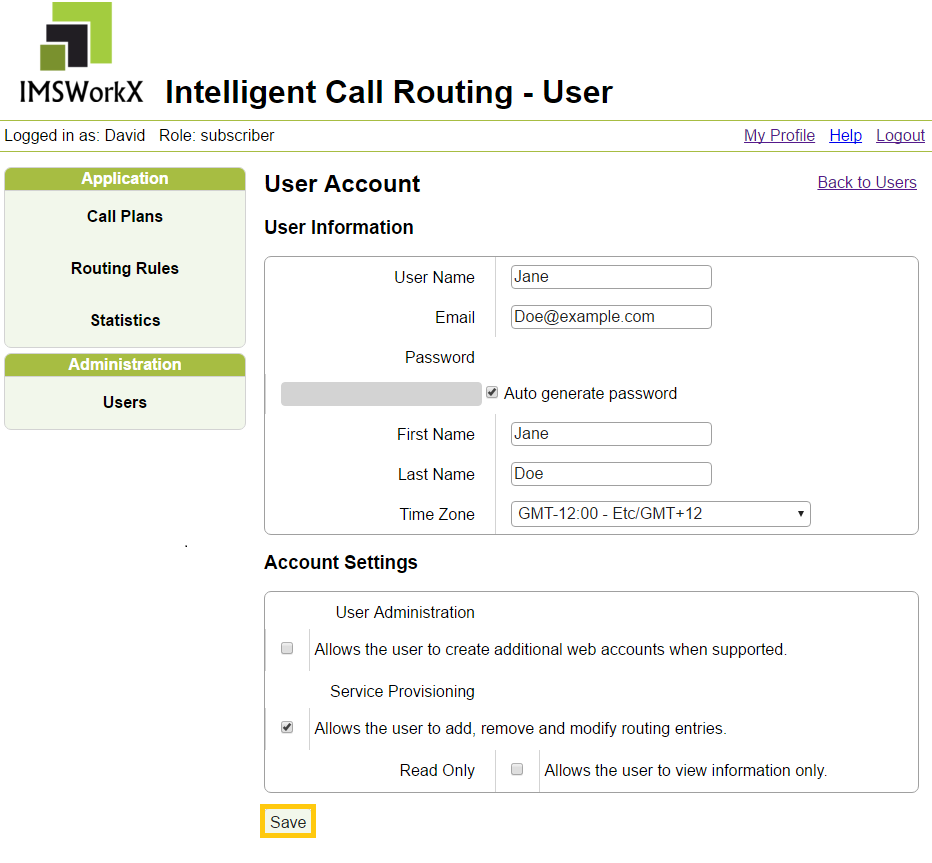
Click Add on the task bar. The User Account window opens.
Enter the User Account information and select the permissions to be assigned to the user.
Setting |
Description |
|---|---|
User Name |
Name used to log in to ICR. |
Email address which receives notifications and password reset requests. |
|
Password |
Temporary password to log in the first time. Can be automatically generated. |
First Name |
First name of entity who uses the account. |
Last Name |
Last name of entity who uses the account. |
Time Zone |
Time Zone for the new user. |
User Adminiatration |
Add additional web accounts. |
Service Provisioning |
Add, remove and edit system routing rules and call plans. |
Read Only |
View System Numbers and Subscribers. |
Click Save to have the changes take effect.
To Edit Users
Select the user to be edited by selecting the checkbox.
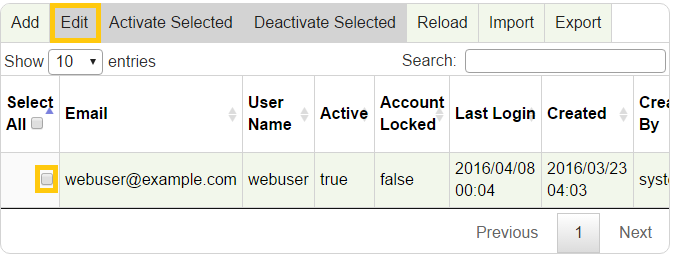
Click Edit on the task bar.
Make the required information changes to User Account and Personal Information. Select the permissions to be added to or removed from the user record.
Click Save Changes.