Web-Based User Interface
The CC web-based user interface (web UI) allows Platform Owners and Service Providers to populate and maintain the routing rules database, monitor statistics, and manage users in CC.
Web Browser Requirements
The CC web UI can be accessed from any of the following web browsers:
Account Roles
The type of user account determines the selections available on the main menu, and the permissions assigned to a user further define the tasks that they can perform.
The different roles are defined as:
Platform Owners deploy the network that runs CC. The Platform Owner is responsible for defining physical egress routes and the Service Providers.
Service Providers are responsible for provisioning calling cards and editing calling card settings including binding and charges.
Each Platform Owner can have the following permissions:
Name |
Permission |
|---|---|
User Administration |
Add, remove, and edit other Platform Owners. |
Service Providers |
Add, remove, and edit Service Providers. |
Settings |
Edit system-wide application settings. |
Each Service Provider can have the following permissions:
Name |
Permission |
|---|---|
Subscriber Administration |
Activate, deactivate, and reset PINs for accounts. |
User Administration |
Add, remove, and edit other Service Providers. |
Service Provisioning |
Add, remove, and edit accounts, rates, rate plans, calling services, and product offerings. |
Settings |
Edit Service Provider settings. |
Navigating in CC
This section describes the common page navigation tools that are used by all accounts.
To see the full list of features that a user can access, select one of the options on the left side of the screen to navigate to that section.
Location on Screen |
Function |
|---|---|
Upper Left |
Shows user name and role of current user. Click the user name to go to the My Account page. |
Left |
Shows the main menu. Click to navigate to other sections of CC. |
Upper Right |
Click to navigate to the Help page or to log out of CC. |
Center |
Shows information or records for the current section of CC. |
Bottom |
Additional options to select, view, and filter records. |
Task Bar
The tasks that a user is able to perform are determined by the permissions assigned when the user account is created.

The task bar provides the following functionality:
Add - Click to open a page where a user can create records for Service Providers and Administrators.
Import and Export - Click to import and export bulk loads of CC records.
Tip
For more information on importing and exporting records, see Provisioning.
Using the Web UI as a Platform Owner
Opening the Web UI
In a web browser, connect to the host address of the NIU.
On the Login page, enter the Username and Password.
Tip
Click Forgot Password to generate a password reset link.
Default user name: cc_administrator Default password: im5_wrkX
Click Login. The My Account page will be displayed.
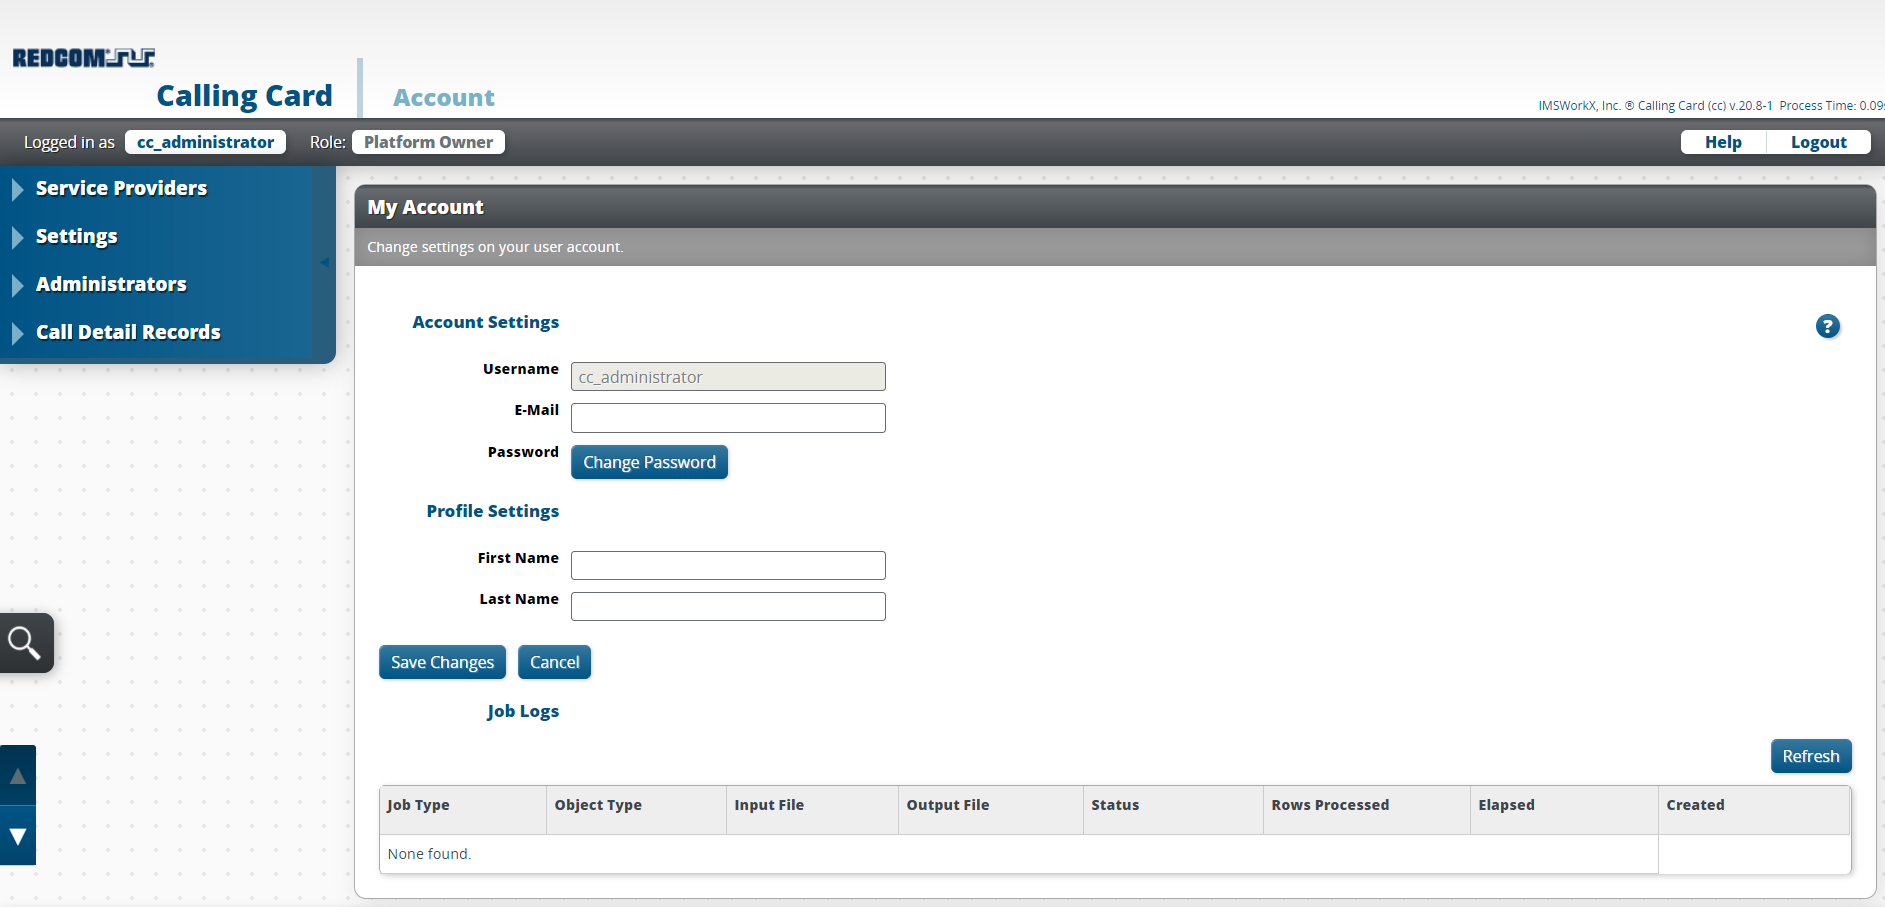
Tip
This page can be accessed at any time by clicking the user name next to “Logged in as”.
Changing the Password
Click Change Password on the My Account page.
Enter the Current Password and the New Password.
Click Save Changes.
Note
The new password must be a minimum of 8 characters and a maximum of 16 characters.
Managing Service Providers
Click Service Providers on the main menu to view a list of all service provider accounts added to CC.
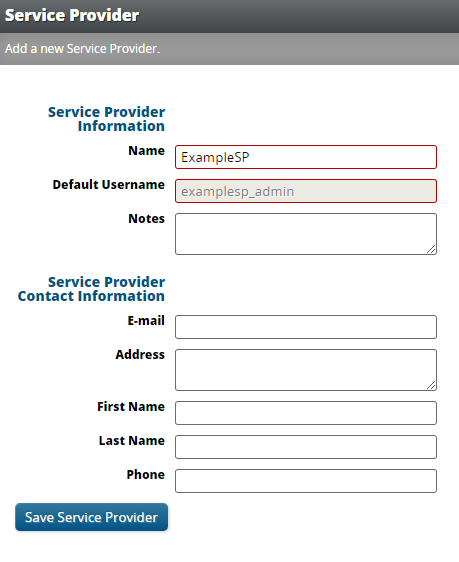
To Add Service Providers
Click Add on the task bar.
Enter the user information in the text boxes.
Setting |
Description |
|---|---|
Name |
Name of the Service Provider. |
Default Username |
User name to log in to the default account. |
Notes |
Blank area to record notes. |
Notifications and password reset requests are sent to this email address. |
|
Address |
Physical address of the Service Provider. |
First Name |
First name of entity who uses the account. |
Last Name |
Last name of entity who uses the account. |
Phone |
Primary phone number of the contact. |
Click Save Service Provider.
To Edit Service Providers
Right-click on the Service Provider to be edited.
Click Edit Service Provider.
Make necessary changes.
Click Save Service Provider.
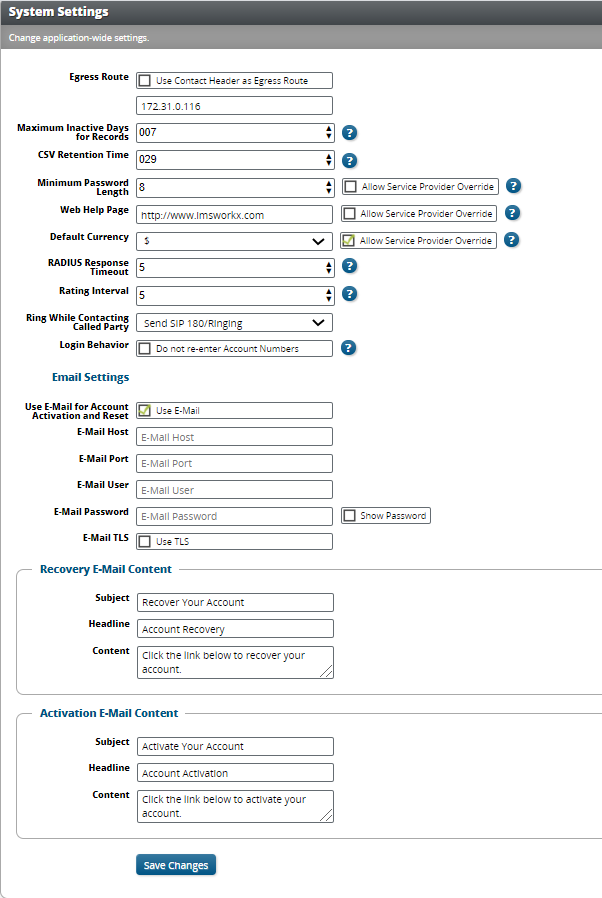
Managing Settings
Click Settings on the main menu to view and edit application-wide settings of CC.
Setting |
Description |
|---|---|
Egress Route |
Specifies the hostname or IP address used in the redirection or connection of SIP calls. If the call is completed using a 302 redirect, the host part of the SIP URI placed in the contact header will be the value set for the egress route. When this setting is left blank, the hostname or IP address in the SIP URI of the Contact header from the initiating INVITE is used. |
Maximum Inactive Days for Records |
CC will remove records that have been inactive longer than this value every night at midnight, which is determined by the time on the active NIU. A value of zero will never remove inactive records. |
CSV Retention Time |
The number of days CSVs for imports and exports will be kept on the system. |
Minimum Password Length |
The minimum number of characters that a password must be. |
Web Help Page |
Determines the page to which Service Providers and subscribers are redirected after selecting Help. |
Default Currency |
The symbol for the default currency type. This can be set to U.S. dollars or Thai Baht. |
RADIUS Response Timeout |
The time, in seconds, to wait for a response before determining the request is failed. |
Rating Interval |
The number of seconds in between call rating attempts. |
Ring While Contacting Called Party |
The type of ringing heard by the caller while waiting for the connection with the called party. This can be set to a ringtone or to silence. |
Login Behavior |
Determines whether account numbers need to be re-entered if an incorrect PIN is entered and PIN-based authentication is required. |
Use E-Mail for Account Activation and Reset |
Determines whether an email message is sent during account activation or password recovery. |
E-Mail Host |
Specifies the host used to send the account activation and password recovery email messages. |
E-Mail Port |
Specifies the port used to send the account activation and password recovery email messages. |
E-Mail User |
Specifies the user used to send the account activation and password recovery email messages. |
E-Mail Password |
Specifies the password of the user used to send the account activation and password recovery email messages. |
E-Mail TLS |
Specifies whether TLS is used for the account activation and password recovery email messages. |
Recovery E-Mail Content |
Determines the Subject, Headline, and Content of a password recovery email message. |
Activation E-Mail Content |
Determines the Subject, Headline, and Content of an account activation email message. |
Warning
To apply changes changes made to settings that affect callflow, the CC application must be restarted.
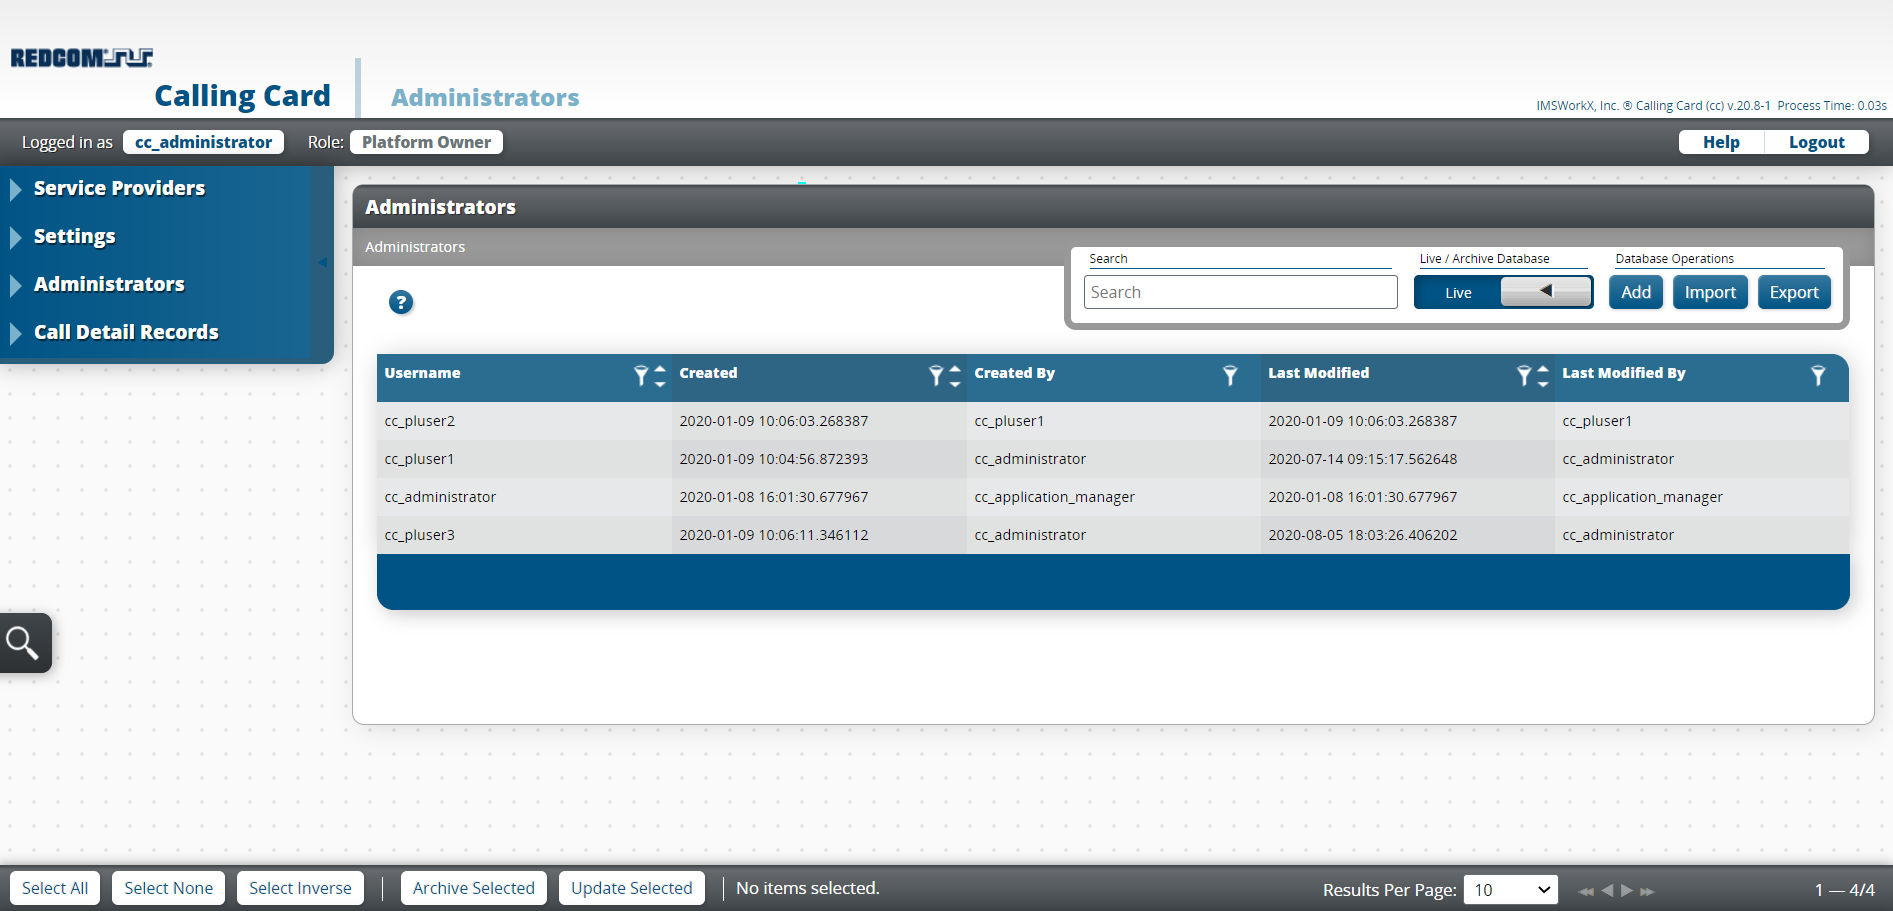
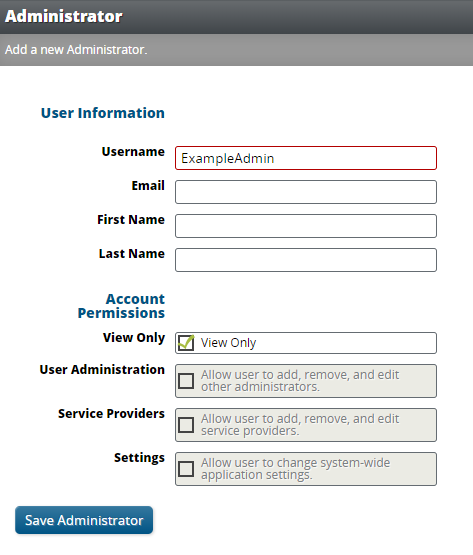
Managing Administrators
Click Administrators on the main menu to view a list of all platform owner accounts added to CC.
To Add Administrators
Click Add on the task bar.
Enter the user information in the text boxes.
Setting |
Description |
|---|---|
Username |
User name to log in to the default account. |
Notifications and password reset requests are sent to this email address. |
|
First Name |
First name of entity who uses the account. |
Last Name |
Last name of entity who uses the account. |
View Only |
Make this account view only or assign permissions. |
User Administration |
Add, edit, and remove other Platform Owners. |
Service Providers |
Add, edit, and remove Service Providers. |
Settings |
Edit system-wide application settings. |
Click Save Administrator.
To Edit Administrators
Right-click on the Administrator to be edited.
Click Edit User
Make necessary changes.
Click Save Administrator.
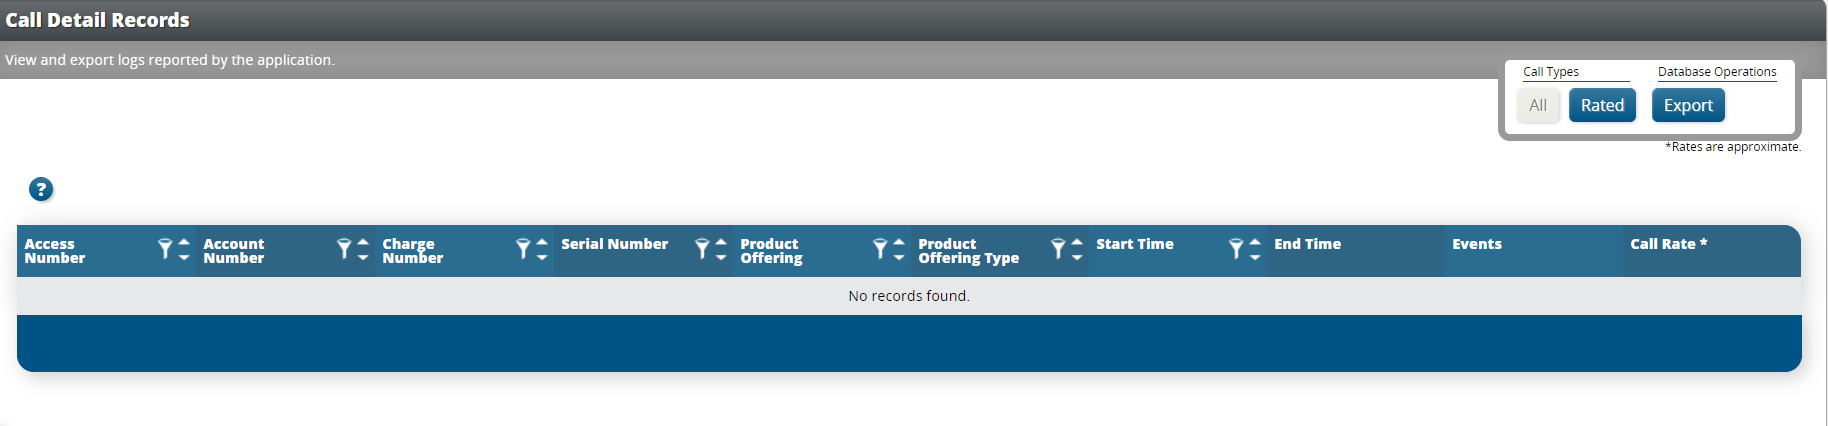
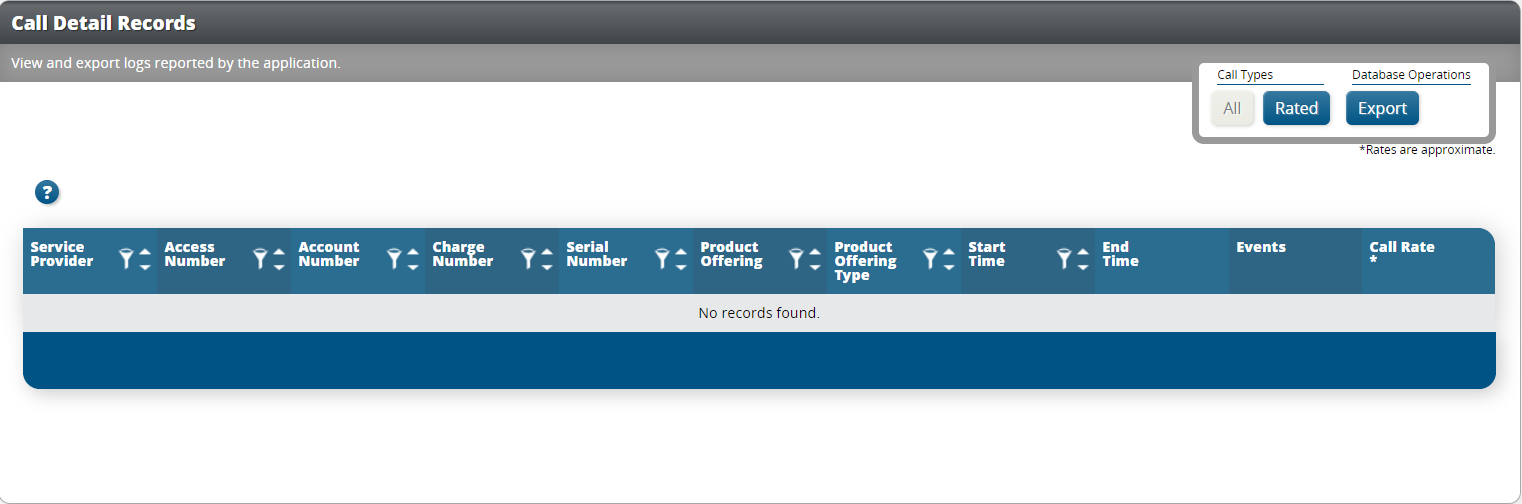
Call Detail Records
Click Call Detail Records on the main menu to view and export Call Detail Records. The type of account and assigned permissions determine the records that are available to view.
Platform Owners can view statistics for all services that they host.
Using the Web UI as a Service Provider
Opening the Web UI
In a web browser, connect to the host address of the NIU.
On the Login page, enter the Username and Password.
Tip
Click Forgot Password to generate a password reset link.
Click Login. The My Account page will be displayed.
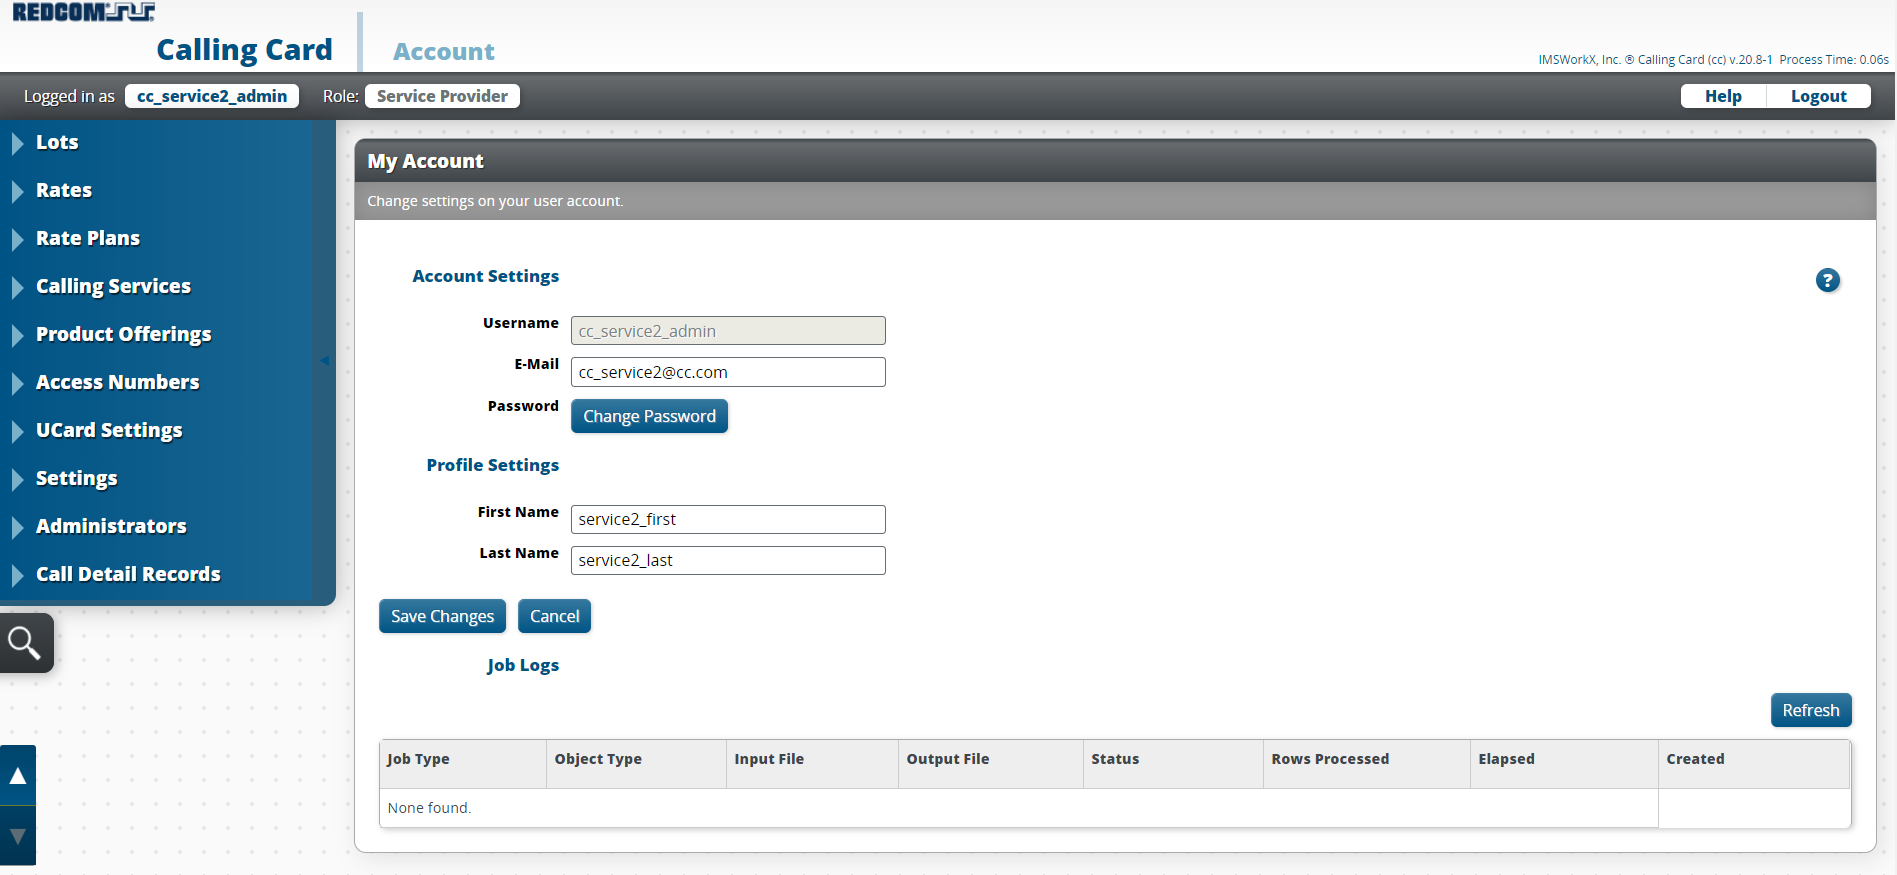
Note
This page can be accessed at any time by clicking the user name next to “Logged in as”.
Changing The Password
Click Change Password on the My Account page.
Enter the Current Password and the New Password.
Click Save Changes.
Tip
The new password must be a minimum of 8 characters and a maximum of 16 characters.
Managing Lots
Click Lots on the main menu to view and edit a list of all account cards added to CC.
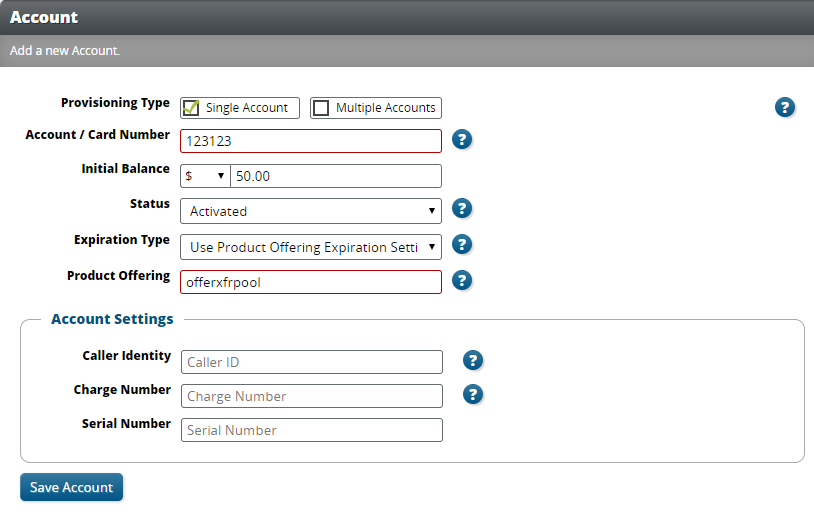
To Add Lots
Click Add on the task bar.
Enter the account card information in the text boxes.
Setting |
Description |
|---|---|
Provisioning Type |
Select whether a single account is being provisioned or if multiple accounts are being bulk provisioned at once. If provisioning multiple accounts, the option is available to select a CSV file for importing. |
Account / Card Number |
The number that is printed on the card. |
Initial Balance |
The initial balance on the card. |
Status |
Select the status of the card on this account. The status options are Activated, Blocked, Empty, Expired, Generated, or Uploaded. |
Expiration Type |
|
Product Offering |
The product offering that the card on this account will use. |
Caller Identity |
The caller ID information that will display for the called party. |
Charge Number |
The number that is charged for billing, which appears on CDRs. |
Serial Number |
The number that is used for identification, such as for identifying a block of accounts. |
Click Save Account.
To Edit Lots
Right-click on the account to be edited.
Click Edit Account.
Make necessary changes.
Click Save Account.
Note
From this page, you can also reset the account PIN, transfer a balance to the account, or transfer a balance from the account by right-clicking on an account.
Managing Rates
Click Rates on the main menu to view a list of all rates added to CC.
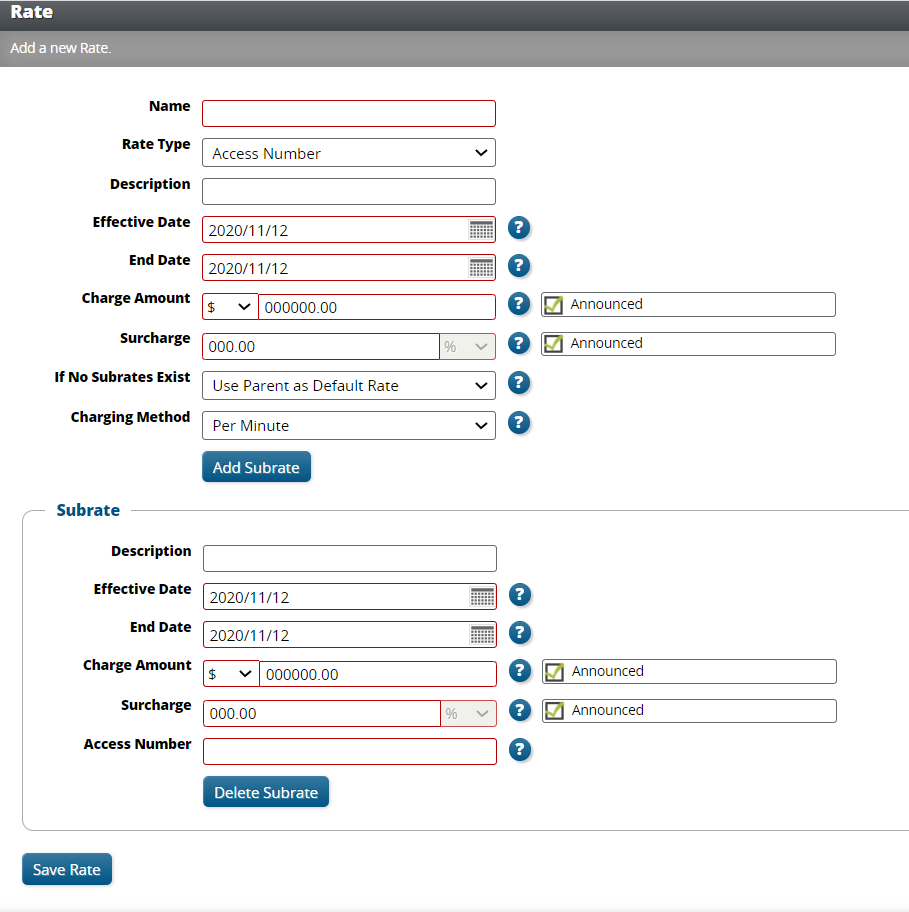
To Add Rates
Click Add on the task bar.
Enter the rate information in the text boxes.
Setting |
Description |
|---|---|
Name |
The name of the rate. |
Rate Type |
Select the type for this rate. The remaining fields to configure will be based on the selected type. |
Description |
The description of the rate, which can be a more detailed name. |
Effective Date |
The day that the rate will start being used. |
End Date |
The day that the rate will stop being used. |
Charge Amount |
The amount that is charged based on the charging method. There is also an option to choose whether this amount will be applied to the time remaining that is announced at the beginning of a call. |
Surcharge |
The percentage-based surcharge to apply to the calculated rate. There is also an option to choose whether this amount will be applied to the time remaining that is announced at the beginning of a call. |
If No Subrates Exist |
The rate treatment if there is no subrate. The options are to charge the default rate amount, apply no rate, or block the event. |
Charging Method |
Determines whether the specified amount is charged per minute (for the duration of the call) or per event (once per call). |
Add Subrate |
Optional fields to add subrates. See table below for subrate settings. Creating subrates is not available for a rate type of payphone. |
Subrate Settings:
Note
The subrate fields to configure will be based on the selected type for the parent rate.
Setting |
Description |
|---|---|
Description |
The description of the subrate, which can be a more detailed name. |
Effective Date |
The day that the subrate will start being used. |
End Date |
The day that the subrate will stop being used. |
Charge Amount |
The amount that is charged based on the charging method. There is also an option to choose whether this amount will be applied to the time remaining that is announced at the beginning of a call. |
Surcharge |
The percentage-based surcharge to apply to the calculated subrate. There is also an option to choose whether this amount will be applied to the time remaining that is announced at the beginning of a call. |
Access Number |
A digit map to match the access number. RFC3435 compliant. |
Destination Digit Map |
A digit map to match the destination number. RFC3435 compliant. |
Origination Digit Map |
A digit map to match the origination number. RFC3435 compliant. |
Rating |
Select Standard to allow up to three surcharge amounts at specified times or Extended Bong to allow the surcharge to repeat on a specified interval. |
Max Call Duration |
Time, in minutes, that the call is allowed to continue. A value of 0 means no maximum duration will be set. |
Call Cutoff |
Plays a warning when the call reaches the specified percentage of the Max Call Duration. A value of 0 means no announcement will be played. |
Tier Rates |
For standard rating, after a Tier Threshold is reached, the per minute charge will change to the next Tier Amount. A call can have up to three tiers. |
Bong Amount |
A flat fee that will be charged at a specific amount of time into the call. There is also an option to choose whether this amount will be applied to the time remaining that is announced at the beginning of a call. |
Bong Time |
The time, in seconds or minutes, after a call starts that the associated Bong Amount will be charged. |
Initial Bong Time |
For extended bong rating, the amount of time into the call that the bong starts. A value of 0 means that the bong starts as soon as the call is connected. |
Bong Interval |
For extended bong rating, the bong charge will be applied based on the selected interval of time. |
Bong Charge |
For extended bong rating, the amount to charge at each Bong Interval. |
Number of Bong Charges |
For extended bong rating, the number of bong charges to allow during the call. A value of 0 means that there is no limit and charges will occur, following the interval, for the duration of the call. |
Connection Fee |
A flat fee that will always be charged at the start of a call. There is also an option to choose whether this amount will be applied to the time remaining that is announced at the beginning of a call. |
Grace Period |
If a caller disconnects before this specified time, the call will not be billed. |
Note
Tiers must be defined in order of time.
Click Save Rate.
To Edit Rates
Right-click on the rate to be edited.
Click Edit Rate.
Make necessary changes.
Click Save Rate.
Managing Rate Plans
Click Rate Plans on the main menu to view a list of all rate plans added to CC.
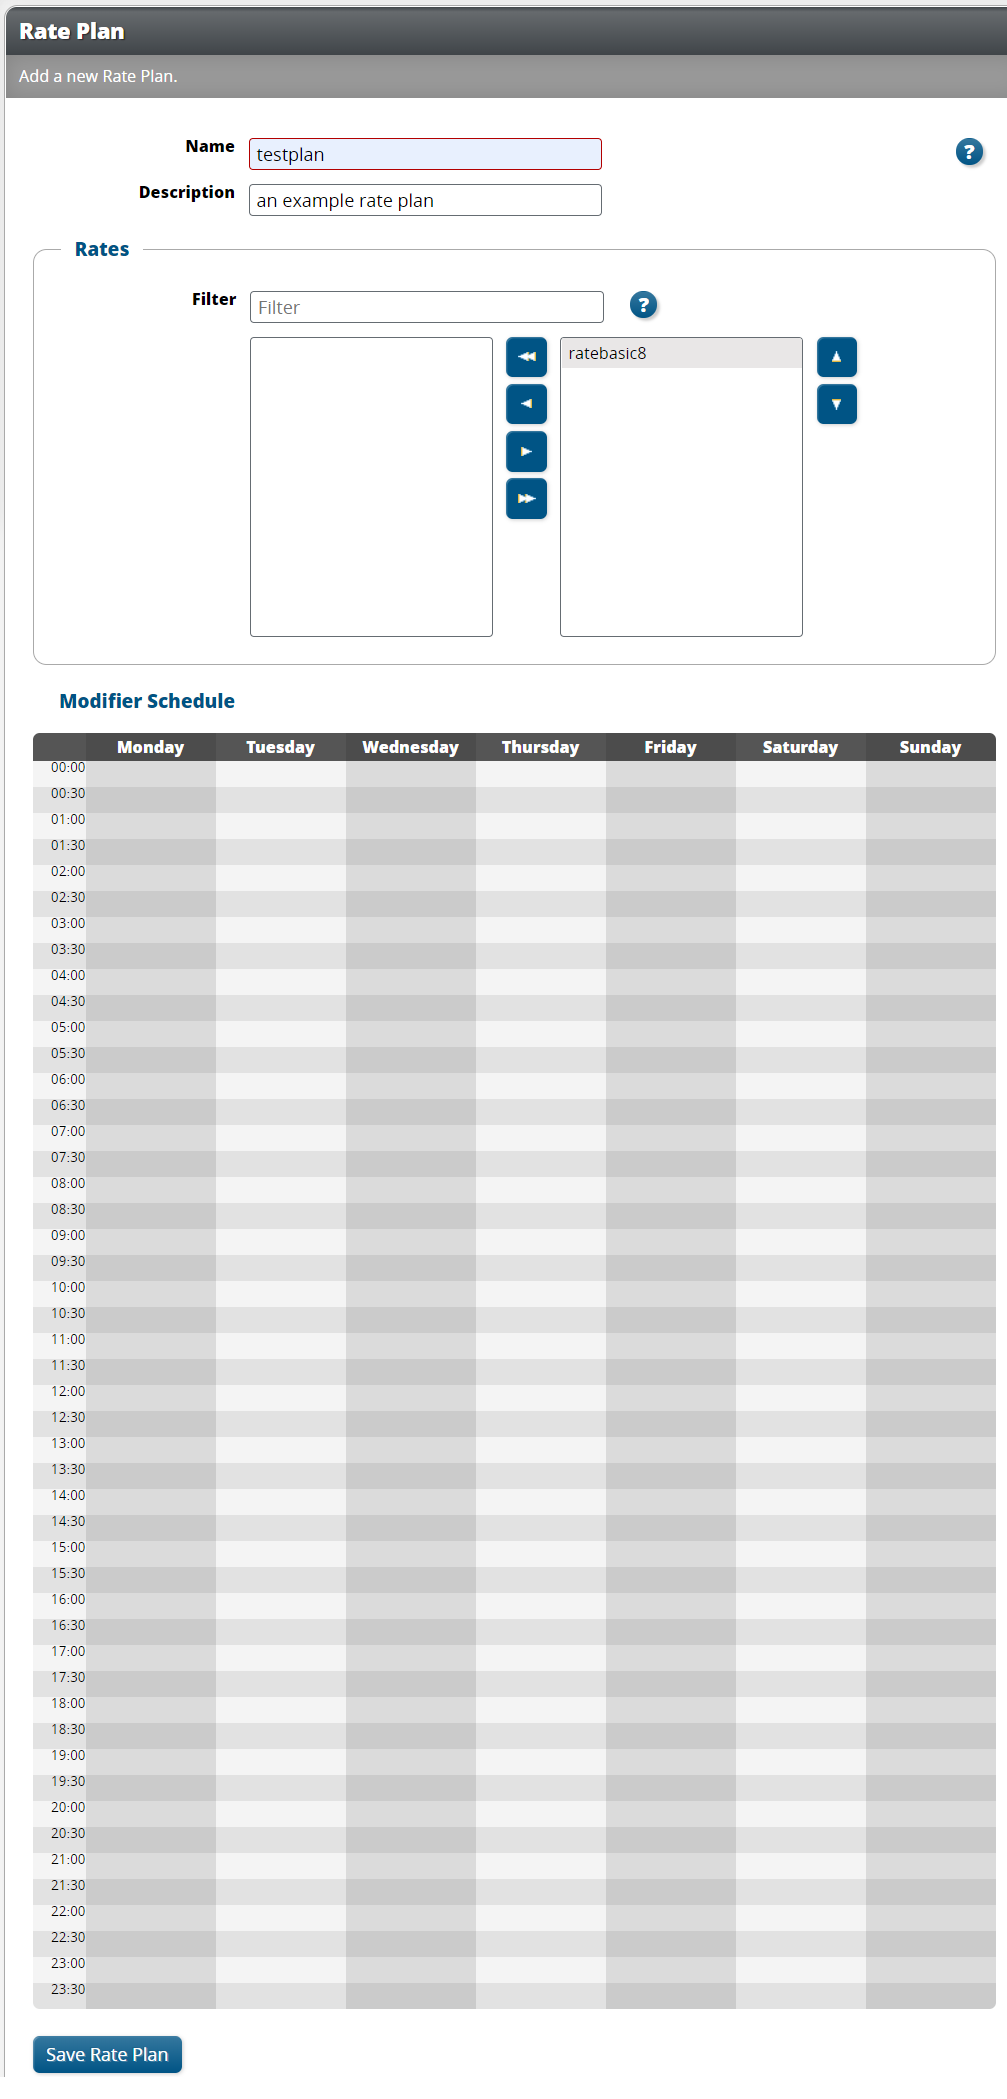
To Add Rate Plans
Click Add on the task bar.
Enter the plan information in the text boxes.
Setting |
Description |
|---|---|
Name |
The name of the rate plan. |
Description |
The description of the rate plan, which can be a more detailed name. |
Rates |
A table of all rates that can be filtered based on name. The rates shown in the column on the right are active. |
Modifier Schedule |
A calendar view to show when the rate plan will be active. |
Click Save Rate Plan.
To Edit Rate Plans
Right-click on the rate plan to be edited.
Click Edit Rate Plan.
Make necessary changes.
Click Save Rate Plan.
Managing Calling Services
Click Calling Services on the main menu to view a list of all calling services added to CC.
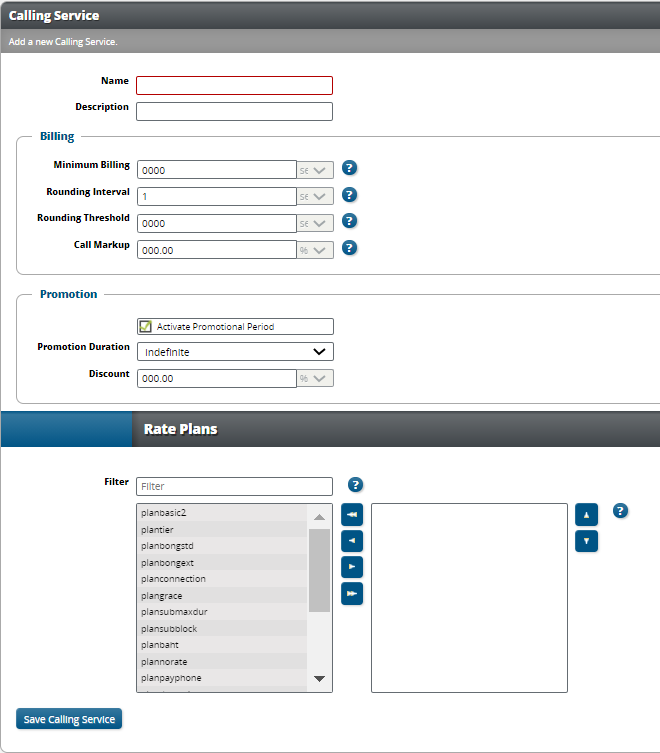
To Add Calling Services
Click Add on the task bar.
Enter the service information in the text boxes.
Setting |
Description |
|---|---|
Name |
The name of the calling service. |
Description |
The description of the calling service, which can be a more detailed name. |
Minimum Billing |
The minimum amount of time a caller will be billed per call. |
Rounding Interval |
The amount of time a call will be rounded to during billing. |
Rounding Threshold |
The amount of time a call will go before being rounded during billing. |
Call Markup |
The percentage of a surcharge to add to bill after the completion of a call. |
Activate Promotional Period |
Activate and define a promotional period. If this is active, set the duration of the promotion and the discount percentage value. |
Rate Plans |
A table of all rate plans that can be filtered based on . The rates shown in the column on the right are active. |
Click Save Calling Service.
To Edit Calling Services
Right-click on the calling service to be edited.
Click Edit Calling Service.
Make the necessary changes.
Click Save Calling Service.
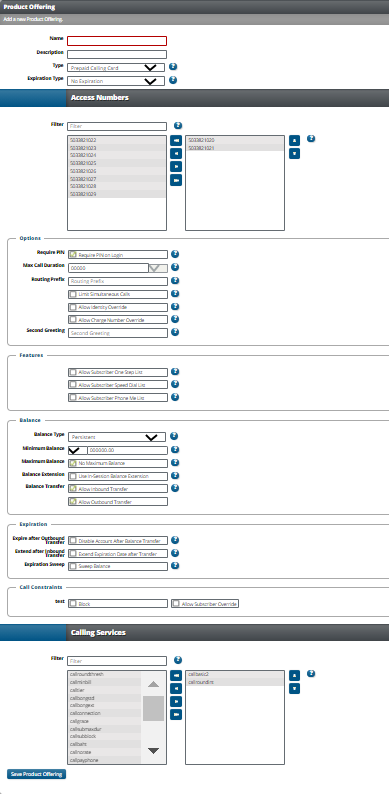
Managing Product Offerings
Click Product Offerings on the main menu to view a list of all product offerings added to CC.
To Add Product Offerings
Click Add on the task bar.
Enter the offering information in the text boxes.
Setting |
Description |
|---|---|
Name |
The name of the product offering. |
Description |
The description of the product offering, which can be a more detailed name. |
Type |
The available options for the type of card are prepaid or postpaid calling card or prepaid or postpaid residential. |
Expiration Type |
|
Access Numbers |
A table of all access numbers that can be filtered based on name. The numbers shown in the column on the right have access to the IVR. |
Require PIN |
Determines whether a user must enter their PIN along with their account number when logging in. |
Max Call Duration |
Time, in minutes, that the call is allowed to continue. A value of 0 means no maximum duration will be set. |
Routing Prefix |
The number to be prepended to all outbound calls after leading zeros are stripped. |
Limit Simultaneous Calls |
Limits the number of calls each product offering allows at the same time from the same card. |
Allow Identity Override |
Allows a subscriber to set their own identity. |
Allow Charge Number Override |
Allows a subscriber to set their own charge number. |
Second Greeting |
The optional announcement that will be played to the caller after successful authentication. |
Allow Subscriber One Step List |
Allows the use of a one-step list of authorized calling numbers. Calls from these numbers do not require a PIN. |
Allow Subscriber Speed Dial List |
Allows the use of a speed dial list of up to 10 numbers. |
Allow Subscriber Phone Me List |
Allows the use of a phone me list to determine allowable destinations. Calls made to numbers that are not in this list are automatically blocked. |
Balance Type |
The balance type for the account. Select Persistent to carry balances indefinitely or select Periodic to carry a balance for a selected period of time before being reset. |
Minimum Balance |
For persistent balances. The minimum balance that an account must have to make a call and remain active. |
Maximum Balance |
For persistent balances. The maximum balance that an account can have at any one time. |
Balance Extension |
For persistent balances. If In-Session Balance Extension is used, a separate balance is used for establishing sessions and cutting off sessions. |
Periodic Balance |
For periodic balances. For prepaid, this is the maximum balance and the amount that will be reloaded after each period. For postpaid, this is the maximum balance for each period and the amount will reset to 0. |
Periodic Type |
For periodic balances. Define whether the periods end at midnight of each day, on a day of each week, or on a day of each month. |
Balance Transfer |
Allows inbound transfers to this account, outbound transfers from this account, or both. |
Expire after Outbound Transfer |
If an account does not have the Minimum Balance after a transfer from it to another account occurs, the account will expire. |
Extend after Inbound Transfer |
If a balance is transferred to an account, extend the expiration date of the account by the specified Expiration Extension Interval from either the current expiration of the transfer date. |
Expiration Sweep |
Expire an account based on the specified Balance Threshold and Activity Threshold. |
Call Constraints |
Configure if the available call constraints will apply to this product offering. Call constraints are configured in Settings. |
Calling Services |
A table of all calling services that can be filtered based on name. The services shown in the column on the right are active. |
Click Show Audio Manager to upload and label custom audio files.
Note
Audio files must have an 8 kHz sample rate and be single channel (mono), µ-law WAV format.
Note
When naming audio files, do not use spaces or any characters that are string delimiters.
Click Save Product Offering.
To Edit Product Offerings
Right-click on the product offering to be edited.
Click Edit Product Offering.
Make the necessary changes.
Click Save Product Offering.
Note
Changing the expiration date of a product offering will not change the expiration date of existing associated accounts. Only new accounts made with the product offering will have the changed expiration date.
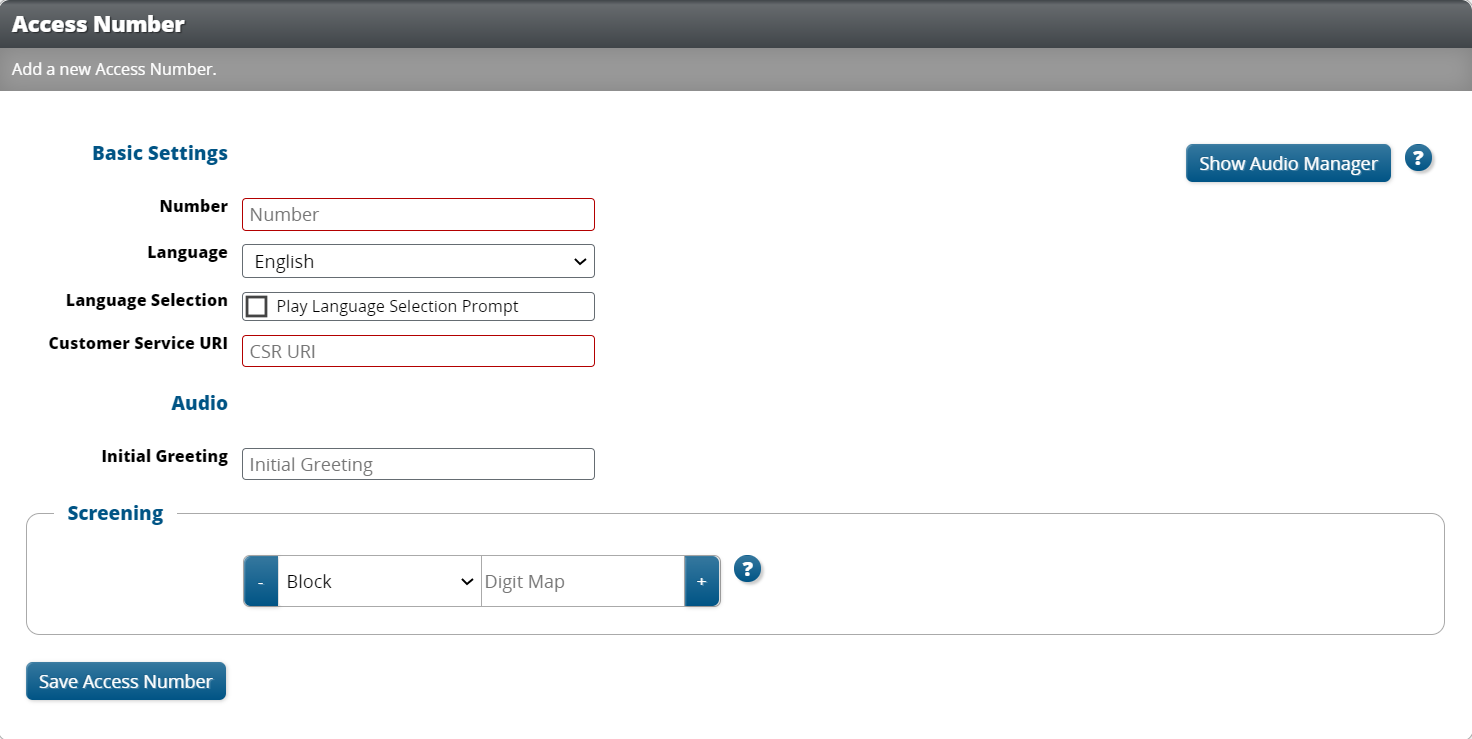
Managing Access Numbers
Click Access Numbers on the main menu to view a list of all access numbers added to CC.
To Add Access Numbers
Click Add on the task bar.
Enter the number information in the text boxes.
Setting |
Description |
|---|---|
Number |
The access number to be dialed by a customer. |
Language |
The default language that will be used when a call connects to this number. |
Language Selection |
Select to play the language selection prompt in the IVR. |
Customer Service URI |
The location to redirect calls to customer service. |
Initial Greeting |
The announcement that will be played to the caller after connecting to this number. |
Screening |
An array of digits to block or require from the calling number to access this number. |
Click Save Access Number.
To Edit Access Numbers
Right-click on the access number to be edited.
Click Edit Access Number.
Make the necessary changes.
Click Save Access Number.
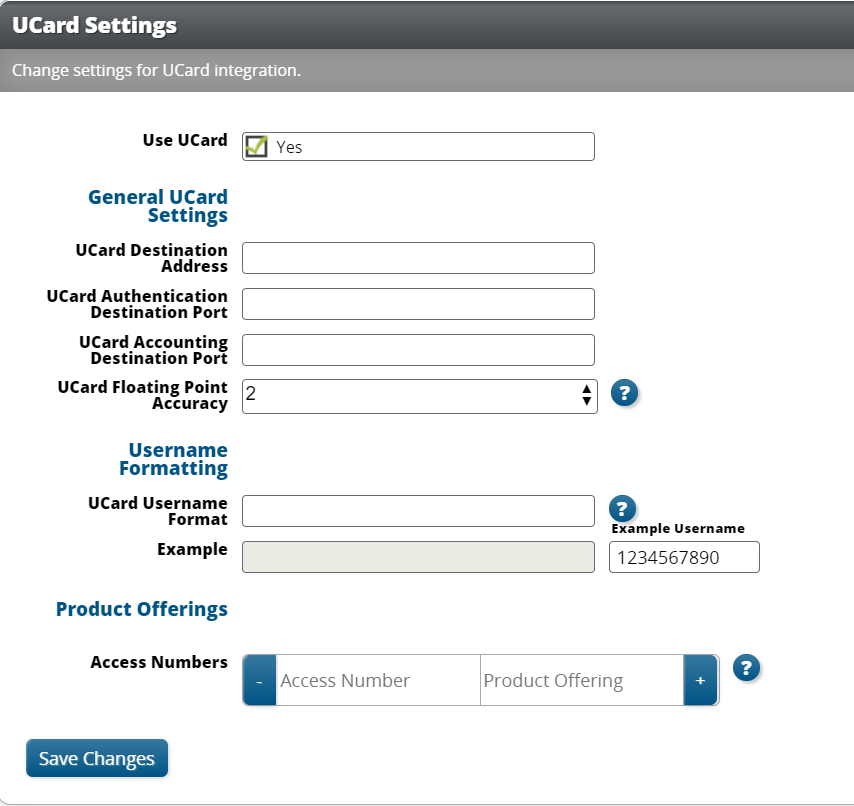
Managing UCard Settings
Click UCard Settings on the main menu to view and edit UCard integration settings.
Setting |
Description |
|---|---|
UCard Destination Address |
The address of the RADIUS server to send both Authentication and Accounting packets to. |
UCard Authentication Destination Port |
The port on the RADIUS server that AccessRequest RADIUS packets will be sent to. |
UCard Accounting Destination Port |
The port on the RADIUS server that AccountingRequest RADIUS packets will be sent to. |
UCard Floating Point Accuracy |
The number of decimal digits to always send to UCard. By default, CC stores all digits. |
UCard Username Format |
The username, which can be a combination of the username and PIN variables, using the following format: {{username}}@{{PIN}}. |
Access Numbers |
A table of access numbers and their associated product offerings used for this UCard. |
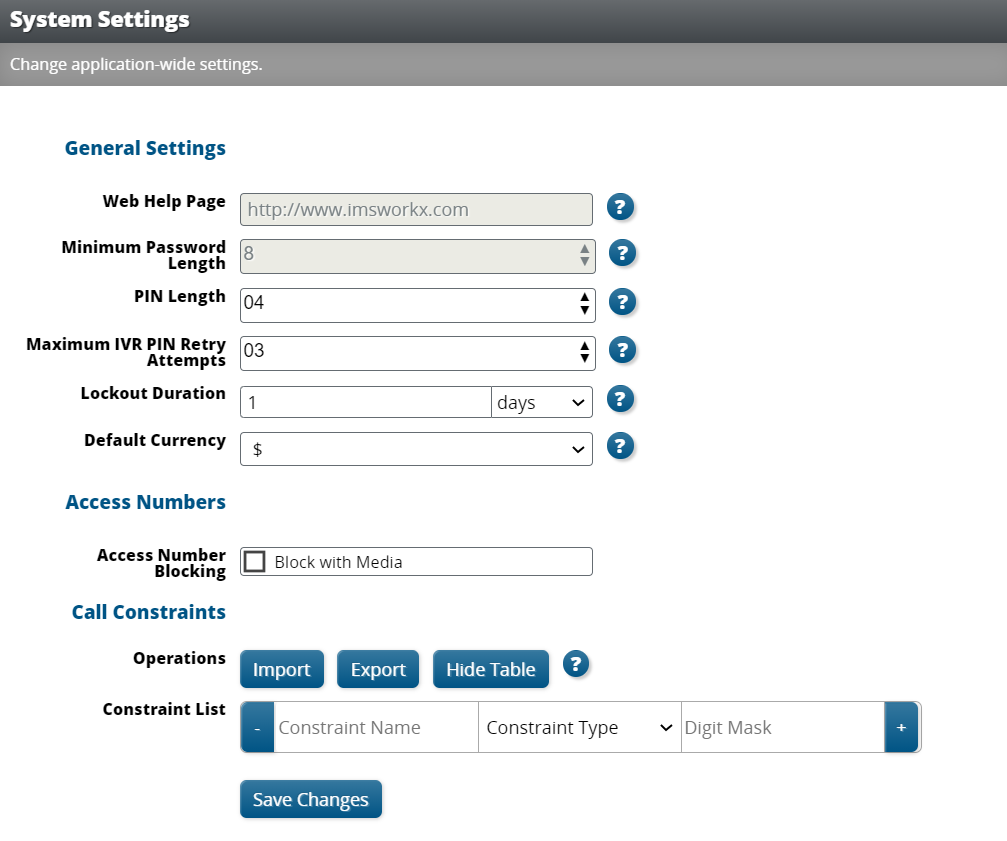
Managing Settings
Click Settings on the main menu to view and edit application-wide settings of CC.
Note
Some settings may not be available to change based on override permissions set by the Platform Owner.
Setting |
Description |
|---|---|
Web Help Page |
Determines the page to which Service Providers and subscribers are redirected after selecting Help. |
Minimum Password Length |
The minimum number of characters that a password must be. |
PIN Length |
The minimum number of digits that a PIN must be. |
Maximum IVR PIN Retry Attempts |
The number of times an incorrect PIN can be entered before the account is locked out. This value must be between 3 and 100. |
Lockout Duration |
The length of time an account is locked out after exceeding the values set for Maximum IVR PIN Retry Attempts. |
Default Currency |
The symbol for the default currency type. This can be set to U.S. dollars or Thai Baht. |
Access Number Blocking |
Determine whether access numbers are blocked with an announcement. |
Constraint List |
A table of constraints that can be applied to product offerings. The specified digit maps can either be required or blocked. The constraint syntax is as follows: “X” requires exactly one digit per X and “x” is a wild card for any number of digits. |
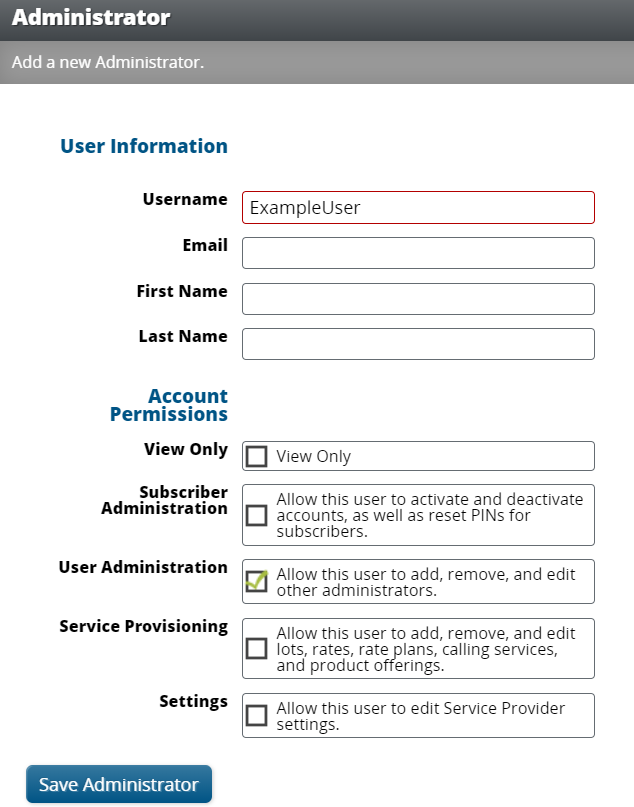
Managing Administrators
Click Administrators on the main menu to view a list of all service provider accounts added to CC.
To Add Administrators
Click Add on the task bar.
Enter the user information in the text boxes.
Setting |
Description |
|---|---|
Username |
User name to log in to the default account. |
Notifications and password reset requests are sent to this email address. |
|
First Name |
First name of entity who uses the account. |
Last Name |
Last name of entity who uses the account. |
View Only |
Make this account view only or assign permissions. |
Subscriber Administration |
Activate, deactivate, and reset PINs for accounts. |
User Administration |
Add, edit, and remove other Service Providers. |
Service Provisioning |
Add, edit, and remove Accounts and Numbers. |
Settings |
Edit Service Provider settings. |
Click Save Administrator.
To Edit Administrators
Right-click on the Administrator to be edited.
Click Edit User.
Make necessary changes.
Click Save Administrator.
Call Detail Records
Click Call Detail Records on the main menu to view and export Call Detail Records. The type of account and assigned permissions determine the records that are available to view.
Service Providers can see Call Detail Records for all their accounts.